Tuscan Salad with Homemade Roasted Garlic Croutons

Happy Friday friends! Sorry for the blog silence yesterday. It was a holiday here in Bavaria {these wonderful Catholics seem to have a holiday for everything!} and, while it was not my intention to take the day off, sometimes spending quality time with the Kiwi just trumps.

During our day off yesterday, I started reading Inferno. While the Kiwi has some strange hatred for Dan Brown books {despite having never picked up a singe one}, I quite like them, so I’m pretty excited to read this new one. I knew it was set in Florence, but man, its like I’m there again, except for the whole being on the run from an assassin. {That’s not a spoiler it’s on like page 2. Plus what else is Robert Langdon going to be doing? Sightseeing?} Really though, its making me miss Florence, Italian food, and wine. Mostly the wine…and the truffles.

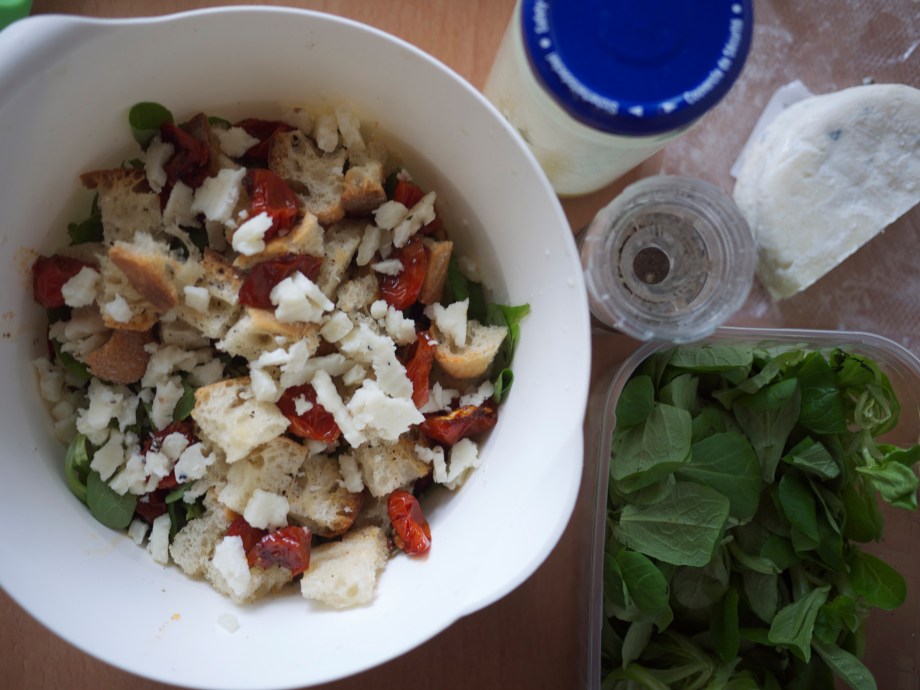
Obviously this Tuscan salad was happening. I was inspired by a recipe one of my absolute favorite bloggers {seriously, Emily’s blog was what introduced me to this wonderful world of blogging} posted a long time ago.  We tweaked it a bit based on what we had on hand and some of the salads we had in Florence, but either way it is a phenomenal salad.

Kiwi+Peach: Tuscan Salad with Homemade Roasted Garlic Croutons

Tuscan Salad with Homemade Roasted Garlic Croutons

{inspired by Emily from Jones Design Company}

The Prep
10-12 cherry tomatoes
1 Tbsp olive oil
1 sprig of fresh rosemary
salt and pepper
1 bulb of garlic
1 Tbsp olive oil

The Salad
150-200 grams {2 cups or so} of mixed greens, washed
8-10 fresh basil leaves, sliced
10 fresh black olives, pitted
1/2 cup pecorino cheese, crumbled
1/4 of a small red onion, sliced

The Croutons
4 thick slices of ciabatta bread
2 Tbsp olive oil
2 cloves of roasted garlic, pureed
1/4 cup pine nuts

The Dressing
2 Tbsp. red wine vinegar
1 tsp. spicy dijon mustard
1/4 of a small red onion
1 clove of roasted garlic
3-4 leaves of fresh oregano
salt and pepper
1/4 cup of olive oil

First thing we have to do is put the tomatoes and the garlic on to roast. Preheat the oven to 300°F/150°C. For the roasted tomatoes, slice the tomatoes in half and in a large mixing bowl combine with olive oil, chopped rosemary, salt, and pepper. Mix well and then put them on a lined baking tray.  For the roasted garlic, cut the garlic bulb straight across on the stem end. Set it root side down on a piece of tin foil and pour the olive over the top. Wrap it up in  the tin foil and place on the tray with the tomatoes. Pop them in the oven for an hour.

Go chill out for 45 minutes. Read Inferno, or I guess you could be productive. Anyway…

About 15 minutes before the tomatoes and garlic are finished, come on back to the kitchen and combine all of the salad ingredients in that large bowl you were using before. Also, go ahead and slice your ciabatta bread and brush on the olive oil.

When the tomatoes and garlic are finished take them out and put the oven on broil {or grill for y’all Kiwis}. Toss the roasted tomatoes in with your salad mix.

Pop out 2 cloves from the garlic bulb and puree them in the food processor. Then spread the puree on your ciabatta bread. Place the slices on the baking sheet along with your pine nuts and put it in the oven for about 5 minutes. Keep an eye on the pine nuts. You just want them to be a bit toasted, not charred. If they are toasted before the bread, just take them out, add it to the salad mix, and put the bread back in the oven.

While the bread is a toasting, let’s make that dressing. Put all of your dressing ingredients in the food processor and pulse until you’re happy with the consistency.

When the bread is toasted, take it out, chop into bite sized cubes, and add it to your salad mix. Pour the dressing over to whole thing and toss well.

Kiwi+Peach: Tuscan Salad with Homemade Roasted Garlic Croutons

DIY Almond Milk

I’m lactose intolerant. Not in a Leonard kind of way, but in a if-I-eat-dairy-without-taking-my-medicine-I’ll-be-throwing-up-in-a-couple-of-hours kind of way.

It’s really not a big deal though. I actually h.a.t.e. the smell of milk {it all smells sour to me}. I hands-down prefer sorbet or frozen yogurt to ice cream. And let’s face it, all the best cheeses like gorgonzola, parmesan, gouda are all fine since they are fattier {meaning they have very little lactose}. For anything else, I can always take a little pill that provides that magic lactase enzyme I’m missing.  Not a big deal at all!

What I don’t like is having to take medicine when there is a perfectly tasty alternative. Enter milk alternatives.

I’ve been a soy drinker since I found out I was lactose intolerant, but in an effort to veer away from possible GMOs and highly processed stuff, I’ve switched to almond milk. It’s so tasty y’all! Even better is that you can make it yourself. It takes a little bit of forethought since the milk goes bad within a few days, but once you get into a rhythm it really is the simplest thing in the world!

Kiwi+Peach: DIY Almond Milk

I follow The Kitchn’s instructions for making it, but here is the condensed version. Soak your almonds overnight. Drain and rinse them then pop them in a food processor. Add fresh water and then process for about 3-4 minutes. Lay a piece of cheese cloth over a bowl. When you’re finished processing the almonds, pour the mixture onto the cheese cloth. Gather the edges and squeeze all the liquid out of the meal. Sweeten with honey or maple syrup and you’re good to go.

I find that a half batch {1/2 cup almonds, 1 cup water, 1 Tbsp honey} will last me for 2-3 days which is probably only how long it will be fresh for anyway.

My biggest piece of advice is use cheesecloth. I couldn’t find it at all here in Munich, so I had my folks stock me up on their last visit. It’s exactly ten million times easier if you use a cheesecloth rather than a sieve. {I also may or may not have broken our sieve the first time I tried to make it.}

Don’t throw that leftover almond meal away though! There is so much you can do with it. My favorite ways are using it for breading my fried chicken or in a tasty pie crust.

What do you think? Would you ever try making your own almond milk? If you try it, let me know, you hipster you!

BBQ Chicken and Caramelized Onion Sandwich

I have really terrible luck when it comes to restaurants I like staying in business. My hometown gets a great brunch place next to a farmers market. Closed. One of my favorite beach restaurants opens a branch in Athens, and I can get sweet potato fries with blue cheese dipping sauce whenever I want. Nope, closed. Find a brunch place with the best chicken salad ever. Closed. When I moved to Munich there was this delicious, farm-to-table place that I absolutely loved. Closed. A unique, quirky coffee shop where my friends would have our coffee dates with the friendliest barista in town. Closed. We finally locate a place that does spicy {and reasonably priced} takeaway mexican food. Closed.

I think I’m jinxed.

So it’s with a lot of fear that I mention this next place to you. There would be real tears if this place closed. I just don’t think I could handle it. This place called Transmetropolitan. Now, this isn’t new news to anyone who has ever been to Athens {Georgia, not Greece}, but Transmet is the place to go for a delicious, substantial, and cheap slice of pizza. Seriously, you can get a slice of sicilian bigger than my face for like 2 bucks. College kids can’t beat it. My staple, during the college years, was the Johnny Hector’s BBQ Pizza. It had these amazing caramelized onions and a sweet and spicy BBQ sauce that really set it apart from other BBQ pizzas I’ve had in my day. So. Good. Y’all.

If you’re ever in Athens, please promise me you’ll check them out. Pretty please. You don’t want to see the tears.

So what’s a girl to do when she’s half way around the world and craving a Johnny Hector? Obviously we are going to make our own.

Kiwi+Peach: BBQ Chicken and Caramelized Onion Sandwich

BBQ Chicken Sandwich

The Onions
½ red onion
2 tsp butter
1 tsp brown sugar

The Chicken
1 chicken breast
pinch of salt and pepper
1 tsp olive oil
2 Tbsp bbq sauce

The Assembly
2 buns
2 Tbsp bbq sauce
1/4 cup cheese {gouda is good} or 1/2 ball of buffalo mozzarella

Start heating a pan on medium high heat. Slice your onion and when the pan is hot, drop the butter in the pan, add the onions, and then sprinkle with brown sugar. Give it a stir and cook for 10 minutes or until they are caramelized to your liking. When they are finished, put them in a small bowl and set them to the side.

While the onions are a caramelizing, slice your chicken breast into strips and sprinkle a bit of salt and pepper over the strips. Once the pan is free, add the olive oil and chicken to the pan. Seal the chicken on one side and then let it cook on the other side, undisturbed for about 3 or 4 minutes and then flip. After a few more minutes, pour the bbq sauce over the chicken and give it a stir until the pieces are completely covered. Let it cook until all the bbq sauce has been reduced then remove from the heat.

While the chicken is cooking, grate your cheese {or slice your mozzarella} and your buns. Spread bbq sauce on each side of the bun. When the chicken is finished, load the bottom halves of the sandwiches with the chicken, onions, and grated cheese. Pop them in the oven on broil {or grill for y’all Kiwis} until the cheese melts {3-5 minutes depending on your oven}.

Put the top on and get messy!

Friday Links

What do you have on tap this weekend friends?

The Kiwi and I are headed to the Dachauer Volksfest. Knowing that it’s essential to train our bodies for the Maße of beer and straight animal fat we’re going to be consuming at Oktoberfest, we are getting an early start. Well that and the Kiwi is always looking for an opportunity to wear his lederhosen.

On a completely separate note…

Thank you, thank you, thank you for your amazing support in Small Cool Kitchens 2013. We made it to the top five! From here the judges will pick the winner, and, while I secretly think that one of the others should win hands down, I’m just tickled pink to have been featured and to have made it that far. {Read: I’m relieved it wasn’t a gigantic embarrassment and that no one seemed to think our kitchen had no business being on The Kitchn.} So thank you.

Kiwi+Peach: Friday Links

Really want to try this recipe this weekend.

…and this one too.

23 days.

Would you eat the test tube burger?

A response to the ‘Frankenburger.’

Speaking of strange burgers

it’s not a good sign when a comedian is your think tank.

This proposal can’t help but make you smile {and maybe cry just a little}.

Make your own brown sugar.

Take that Kiwi. {I question it’s validity, but it’s pretty and makes me feel better about life.}

Photo{shop} bomb.

This would make my day every. single. day.

Baked Jalapeño Poppers

We have found that, as a general rule, Germans are not huge fans of the spicy stuff.  German extra hot salsa is what we in the States would call mild. At our favorite Mexican take away, Condesa, which recently closed {sob}, they always asked what level of spicy sauce we want: 1 {German spicy, no not spicy at all}, 2 {American spicy}, 3 {Mexican spicy}, or a 4 which had the chilies spilling out the top of the bottle {I’m going to go ahead and assume that was English spicy}. That is why I laughed out loud at the shop the other day when I saw some habaneros. It took me a year and a half to find a jalapeño in this city, but they have habaneros, something that even I am not going to touch. Go figure.

Anyway.

I’ve been craving jalapeño poppers ever since we got back from our trip to the States last summer. There is just something about a crispy, spicy pepper filled with cheese that does me in. But, as previously stated, I couldn’t find a jalapeño in this whole city. I checked farmer’s markets, the special grocery stores that are in basements of department stores, and lots of Bio {organic} grocery stores other than my local. Nothing. Until last week, that is. I walk in the store and there, looking me square in the face is a huge basket of lovely, green jalapeños. And I only got a few dirty looks from other shoppers as I shoved handfuls of peppers into my shopping bag.

Naturally, the first thing I did when I got home was to whip up some jalapeño poppers.  Just a warning, these are not for the faint of heart. They are incredibly flavorful, but also really spicy. I’d say they’re a Mexican spicy on the Condesa scale. Unless of course, you miss a few seeds. Then it’s definitely a 4.

Kiwi+Peach: Baked Jalapeño Poppers

Baked Jalapeño Poppers

{inspired by In Fine Balance}

The Stuffing 
1/3 cup cream cheese
1 tsp sugar
1/2 tsp paprika
1/4 tsp cayenne pepper
1/2 tsp salt
1/2 tsp pepper

The Breading 
whole wheat bread crumbs
1/2 tsp salt
1/2 tsp dried oregano

The Wichtige Sachen
6 jalapeños
1 Tbsp olive oil

Preheat your oven on high broil. {Grill for all y’all Kiwis.}

Slice your jalapeños down the middle. Remove the seeds and membranes, but leave the stem. It’s a great handle! As always when dealing with spicy peppers, be sure not to touch your eyes, nose, mouth, face, etc. until you’ve washed your hands really well. It makes for an unpleasant experience.

In a bowl, combine your cream cheese with all of the spices and mix well. Spoon a dollop into each pepper. Using the back of the spoon make sure the whole pepper is full of cheese.

On a small plate, mix the breading ingredients. Press each pepper, cheese side down, into the breading and then place on a grill rack. Drizzle a bit of olive oil over the tops of the peppers and pop them in the oven towards the top.

Bake for about 10-12 minutes or until the breading has browned a bit and it’s appropriately crispy.

Serve with some salsa and sour cream. Lots of sour cream.

Dig in! I may or may not have eaten an entire batch for lunch yesterday. True story.

Quinoa Stir Fry

My first experience with quinoa was back in college in one of my food science labs. My teacher presented its as this wonder food that was a grain AND a complete protein {meaning that it contains all 9 essential amino acids which are usually only available in animal products}. We then proceeded to make one of the most delicious casseroles I’ve ever had with it, so naturally I was hooked.

But quinoa really is the wonder grain now. I can understand why its been a fave for vegans, but I’m loving that all us omnivores have jumped on the bandwagon too. In theory, and for a while there it did make it easier to get. A few weeks ago I posted an article about the economics of quinoa, and I understand that it’s not always an easy or cheap grain alternative. We are so lucky that a 500g bag is still just 5 euro here which, compared to a lot of places is a steal.

If quinoa is scarce in your area right now, then go ahead and try it with some brown rice. However, I would throw in a chicken breast or and extra egg just to get that extra protein!

Kiwi+Peach: Quinoa Stir Fry

Quinoa Stir Fry

{adapted for two from DamnDelicious}

The Quinoa
1/2 cup quinoa
1 cup water
1 tsp salt

The Egg
olive oil
1 egg
1 green onion {optional}

The Veg
olive oil
1 clove of garlic
1 small white onion {or 1/2 of a large one}
1 cup fresh mushrooms
2 cups of broccoli {or 1/2 a head}
1/2 of a zucchini
1 ear of corn, cooked

The Juice
1 Tbsp soy sauce
2 tsp. ginger

Start heating a medium sized pot and a large pan with deep sides on medium high heat. Go ahead an boil your jug. In a sieve, rinse your quinoa under hot water for a couple of minutes to rinse off the powdery saponin on the grain that has a really bitter taste. Very important step!

Once the jug has boiled, measure your water and add it to the pot along with the salt. Once it comes to a boil, add the quinoa and reduce the temperature to medium low. Cook for 20 minutes, stirring occasionally, or until the water is absorbed and the quinoa is soft.

While the quinoa is cooking away, pour a bit of olive oil in the pan {just enough for the egg not to stick} and add the egg. Scramble and cook until done then put it in a bowl and set to the side. Return the pan to the heat. {If you have a green onion, slice it up and scramble it in with the egg.}

Now get to chopping. This is all about timing. Mince your garlic and onion first. Then get to work on the mushrooms, broccoli, and zucchini. Wash the mushrooms, remove their stems, and then slice ’em up. Cut the florets off the head of broccoli and give them a rinse. Wash your zucchini, slice into half inch-ish sized slices, and then quarter those slices. Cut the kernels of corn off the ear and break them up into individual kernels.

Add the olive oil to the hot pan and toss in the minced garlic and onions. Cook for about 3-4 minutes.

Toss in the mushrooms, broccoli, zucchini, and corn and cook until the broccoli and zucchini are soft enough for your liking. {Usually 5-7 minutes for us.}

The quinoa should be finishing up by now, so use a fork to fluff it up a bit and remove it from the heat.

When your veggies are appropriately soft, add the quinoa to the pan. {I push all the veggies to the side, add a little bit more olive oil to the empty part of the pan and then add the quinoa a little at a time so that the quinoa can get a little bit crispy.} Go ahead and throw that scrambled egg back in there too and mix well.

Season with a little soy sauce and ginger and cook for a couple more minutes. Serve it up and enjoy. I always use a little sriracha sauce on mine for an extra little kick, but it’s just as delicious without.

Milan Food Guide

After our lovely couple of days in Zermatt taking in all the mountain air our hearts could hold we headed on to Milan. We were only Milan for a quick minute, but it served our purpose as being a cheaper place to stay for our visit to Lake Como which was a ‘can’t miss’ for both of us. Even though we weren’t there long, I couldn’t let it go unmentioned because we had one really outstanding meal there.

Kiwi+Peach: Milan Food Guide

The joint was called La Bottega del Vino and its right near Park Sempione. It is actually a wine bar that has about 3 or 4 mains offered along with a bunch of appetizer type goodies. This was our first meal in Italy and therefore  we were out of the land of menus in Deutsch and in the land of menus in Italian. Y’all, I know zilch, zero, nada Italiano. So, after a brief moment of being completely overwhelmed with the fact that this was going to be our lives for the next two weeks, I got over it and randomly pointed to something. That something was seared scallops in a lemon pea sauce with bits of candied lemon peel. Thank the Lord I didn’t know what I was getting or I probably wouldn’t have ordered it. {I love, love, love scallops but the Kiwi is allergic, so I tend to steer clear so that he will still kiss me. Oh, the things I do for love.} The Kiwi also went with the randomly pointing method for ordering and his was a winner too! Strips of grilled beef over grilled veggies served on a piece of slate. So folks, the moral of the story is when in doubt, be adventurous. You can always swap with someone else at your table.

Kiwi+Peach: Milan Food Guide   Kiwi+Peach: Milan Food Guide

other Milan + Lake Como tips

Milan is a great base for a visit to Lake Como if you want somewhere cheaper to stay. There is a local train from Milan to Como that takes an hour and costs 10 euro round trip. It leaves every hour from Garibaldi {right near La Bottega del VIno}.

The fast ferry boat is fast, but the view is crap. We took the fast boat out to Bellagio where we spent the day exploring, but then we took the slow boat back so that we could take in the scenery, take some pictures, and work on our sun tans {read: burns}.

Climb the roof of the Duomo! It was seriously one of the most beautiful rooftops I’ve ever been on, and I’ve been on a few. However, ladies {well really everyone}, if you want to go inside the Duomo afterwards make sure your knees and shoulders are covered or you have something with you to cover them or you’ll be turned away like I was.

The Caprese

Yesterday, around lunch time, I realized we had no bread and then I commenced with the panicking. Most of y’all in the States are thinking ‘So what? Go to the store you lazy bum.’ Not so fast my friends. Three words that really make you pay for any lapse in meal planning preparedness. Sunday. Shopping. Hours. As in, there are none. Grocery stores, retail stores, some restaurants. All closed. Coming from the land of 24 everything, it’s not my favorite thing about living in Germany. I mean, I understand the wonderful things it means about their society {kudos Deutschland} but sometimes I just really need some bread on Sunday.

So what is a girl to do? Naturally I scoured Pinterest for a quick bread recipe because the Kiwi was getting kind of hungry. I found this quick focaccia recipe and immediately started remembering all of the amazing focaccia with olive oil and balsamic we had in Italy. I was sold. You can’t really go wrong with olive oil and balsamic on fresh focaccia bread that is still warm. You know what else goes really well with that? Tomatoes, buffalo mozzarella, and fresh basil from the garden.

Again, kind of like the fried egg and tomatoes, this isn’t as much a recipe as just a simple sandwich you an throw together in no time flat. {That is of course unless you’re making the focaccia too in which case it’s going to take about an hour.} In the end we were pretty pleased with our meal planning fail.

Kiwi+Peach: The Caprese

The Caprese

2 large slices of focaccia bread {or half a loaf of your own}
1 Tbsp olive oil
2 smallish tomatoes {or 1 large one}
1/2 of a ball of buffalo mozzarella
5-6 leaves of fresh basil
1-2 Tbsp balsamic vinegar {depending on your taste}

Slice the focaccia and pour the olive oil over the bottom slice. Then slice your tomatoes, mozzarella, and basil. Layer the tomatoes and mozzarella until the bread is covered and then sprinkle on the basil. Pour the balsamic over the top and close her up.


Don’t forget to vote for us in The Kitchn’s Small Cool Kitchens 2013.

Voting ends tomorrow!

TheKitchn Small Cool Kitchen 2013: Lauren's Tiny Yet Airy Kitchen

Gorilla Pull Apart Bread {aka Jesus}

I acknowledge that is an incredibly sacrilegious title. Please don’t break out the pitchforks or stones just yet. Wait until I’ve shared the recipe.

Once upon a time, my college roommate told me about this episode of Paula Deen where she cooked for Jimmy Carter. {This is all pre-scandal, mind.} One of the things she made was Gorilla Bread. So going based on my roommate’s memory of what was in it, I whipped up this magical concoction that we henceforth called Jesus because it makes you say “Jesus Christ! That’s the best thing I’ve ever put in my mouth!”

{commence stone throwing}

Despite it’s slightly sacrilegious name, it really is the best. thing. ever. Definitely not healthy, but that’s why you had the fried egg and tomatoes last night right? This is really a great something something to whip up if you have house guests and want to impress them with a great breakfast! So let’s get to it shall we?

Kiwi+Peach: Gorilla Bread {aka Jesus}

Gorilla Pull Apart Bread {aka Jesus}

The Caramel
1/4 cup cream {or soy cream}
2 Tbsp butter
1/2 cup brown sugar
1/4 cup pecans, slightly chopped

The Bread
1 Tbsp cinnamon
2 Tbsp sugar
biscuit dough {or a can of the pre-made stuff}
8 ounces of cream cheese

This recipe can be as simple or as labor intensive as you want it to be. If you’re looking for a super quick and impressive breakfast then by all means, use the canned biscuits; use pre-made caramel. Really. It will still be delicious. However, since the Kiwi and I are trying to eliminate highly processed connivence foods {like canned biscuits} from our diet, I decided to be a glutton for punishment do it the slightly harder way.

If you’re making your own caramel, heat all of the ingredients in a pot on medium low heat. Whisk gently for about 8 minutes and then transfer to a bowl. Mix in the pecans and pop it in the fridge to thicken up while you’re getting the rest done.

If you’re making your own biscuit dough, I highly recommend using the Kiwi’s recipe. I whipped up the biscuit dough according to  his fabulous instructions {substituting 1/2 the flour for whole wheat}, but stopped following his instructions after I got the dough made. Then I rolled it out and used the 3 in biscuit cutter to cut out my biscuits.

At this point, the rest of it is the same whether you’re using pre-made or you’ve just made it from scratch.

Preheat the oven according to your biscuit instructions. {450°F/225°C if you’re using the Kiwi’s recipe.}

Go ahead and grease your baking dish. I used a 6 inch pie dish this time, but I’ve had success with loaf pans and with bundt pans too. Use what you got.

In a small bowl, combine the cinnamon and sugar and mix well.

Spoon a good sized dollop of cream cheese in the middle of a biscuit and fold the biscuit around the cream cheese. Roll it into a smooth ball. Roll it around in the cinnamon sugar until it’s completely coated and then transfer to the baking dish.

Repeat for the rest of the biscuits.

Once they’re all in the pan, pour the caramel over the top. Really cover it. Then pop it in the oven to bake according to your biscuit instructions. {20 minutes for the Kiwi’s recipe.} Be sure to put a cookie sheet or something to catch drips underneath just incase the caramel decides to get unruly. Check it occasionally as well. If it starts smelling like burning sugar, take it out. Nothing worse than burnt caramel. That wouldn’t be a good way to start your day!

When it’s finished, let it cool for about 5 minutes and then plate up and enjoy!


Don’t forget to vote for us in The Kitchn’s Small Cool Kitchens 2013!

TheKitchn Small Cool Kitchen 2013: Lauren's Tiny Yet Airy Kitchen