My D’daddy

Tomorrow I was planning on announcing a new service we are going to start offering here on Kiwi and Peach— The Meal Plan. We were going to share a sneak peak of a weekly meal plan and grocery list that would take all the guess work out of dinner time. I was also going to talk about our food philosophy and talk about why we eat {and suggest} what we do.

But I’m not going to. I will eventually, but it will not be tomorrow.

We try to focus on the positive here. We try not to let life’s ups and downs affect our tone and material, but sometimes real life just can’t be glossed over.
Things might be silent around here for a week or so, and I feel like you should know why.

My D'Daddy from Kiwi and Peach

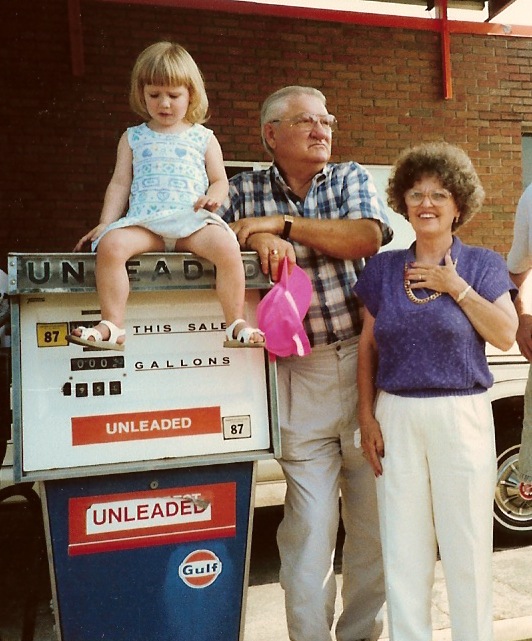
This morning my granddad, my D’Daddy, passed away.

He was 87 and, while his health had deteriorated considerably and he had not been himself in quite some time, the end was quite sudden but thankfully, quite peaceful.

Diane Ackerman is quoted as saying, “I don’t want to get to the end of my life and find that I just lived the length of it. I want to live the width of it as well.”

From living in Japan for four years to running a farm, starting a business, helping to found a hospital and a bank,  being married for nearly 65 years, and raising two strong, beautiful daughters, he certainly did that.

To me he is my cocky, incredibly self-assured D’daddy who bought me a horse first and then taught me to ride.

He was always a man who knew things. {Except how to work a microwave, he never did learn how to do that.}

He taught me the importance of building relationships—it is, after all, all about who you know.

He’s the one who taught me that a big watermelon shared with family and a seed spitting contest is the perfect way to cool down on a hot summer day in Georgia.

My D'Daddy from Kiwi and Peach

My D'Daddy from Kiwi and Peach

My D'Daddy from Kiwi and Peach

My D'Daddy from Kiwi and Peach

My D'Daddy from Kiwi and Peach

When he was living in Okinawa just after WWII ended, he managed a hotel where the military officers went for R&R. When it came time for him to leave, the head housekeeper, Mama San he called her, who according to him had to be at least 100, gave him a precious gift—two pearls that had been in her family for years. Precious and some might say prophetic. He came back to the States, married my Memommy, and they had two little girls, my aunt and my mama.

When I was 21, the pearl, which had been set in a ring, was handed down to me. I know I am incredibly lucky to have had this man in my life for as long as I did.  Everyday when I see it, I’m reminded of all he taught me; the importance of family, the importance of having confidence on myself and my abilities, and most importantly, how to spit a watermelon seed.

I love you, D’daddy.

Please keep us in your thoughts tomorrow as we try to navigate our way back to Georgia and through the mess that is Atlanta so that we can be with family.

The Kiwi’s Rock Cakes

Growing up in New Zealand, Rock Cakes were a Kiwi classic known to practically every family through their presence in the ubiquitous Edmonds Cook Book—the mainstay of Kiwi home baking for the better part of a century. We used to eat them at half-time while watching rugby on TV, or as a treat for lunch on a cold winter Sunday. This Sunday being the occasion of the Super Bowl, you {not us though—we don’t have a TV} have the opportunity to sort-of combine both. Maybe eat them halfway through the first quarter, before they get cold.

This recipe is adapted from an ancient version of the venerable Edmonds Cook Book owned by my maternal grandmother, and originally used Edmonds “Cake Baking Powder”. This was a substance introduced during wartime rationing to replace eggs. Lauren tells me that egg is used not only as a binding agent but also as a leavening agent, and I believe Cake Baking Powder fulfilled the latter purpose. When it was eventually withdrawn from sale in the late 1980s, it was to howls of protest, widespread stockpiling and supermarket riots as old grannies fought each other in the aisles for the last few cans as over baseball bats in a Zombie Apocalypse. OK, I made that last part up, but the stockpiling was real.

Cake Baking Powder was replaced in this recipe by regular Baking Powder, and everyone agreed that you couldn’t tell the difference.

The Kiwi's Rock Cakes from Kiwi and Peach

Rock Cakes

{makes 8-10 cakes}

110g {4 ounces} butter
¼ cup sugar
1¾ cups flour
110g {4 ounces} dried currants
1 heaping tsp baking powder
½ cup milk

Preheat the oven to 390°F/200°C.

In a large bowl, soften {but do not melt} the butter in the microwave. Cream the butter and sugar together, then sift in the rest of the dry ingredients and add the currants. Add enough milk to make the dough stiff—the measurement is not exact and depends on how soft the butter is.

Cover a cold baking tray with baking paper and spoon around 8–10 dollops of your mixture onto it using a pair of spoons. Don’t worry about making them neat and round—that’s very much not the point here.

The Kiwi's Rock Cakes from Kiwi and Peach

Bake at 390°F/200°C for 15–20 minutes until they just start to turn brown {test with a skewer if you’re not sure}. Turn them out onto a wire rack to cool for 5 minutes.

Rock Cakes are best eaten warm, liberally buttered on the flat side. They’re good with jam too. And, if you want, they’re not a bad snack to have around for the next days lunch. Butter a pair and stick them together and you can even take them to work with you without making too big a mess.

The Kiwi's Rock Cakes from Kiwi and Peach

Butternut and Beer: A Mac and Cheese Challenge

After a whirlwind of a weekend, the Kiwi, Dooley, and I are back from DC, no worse for the wear, and full to the brim from good food and lots of laughter. Did you enjoy your long weekend? What did you do with your day off?

In Germany, we had lots of these random days off in the middle of the week. {Thank you, Bavaria.} Most of the time we were able to schedule travel around those days, but sometimes we just stayed home, cooked ourselves a nice meal and relaxed which also happens to be one of our favorite ways to spend a lazy Sunday, but that’s beside the point. Days like that are perfect for tackling those longer recipes that won’t be weeknight staples, but are nice to have up your sleeve for a dinner party or when you want to impress folks. This recipe is kind of like that.

Wait, mac and cheese? Impressive? You bet your buns it’s impressive. Though I’ll allow that this isn’t your average macaroni. No Kraft boxes or neon yellow ‘cheese’ sauce to be found here. What we have instead are layers of complex flavors like sweet, earthy vegetables, strong, creamy cheeses, and malty, caramel-y beer that work together to create a very grown-up party in your mouth. It’s also chock full of winter vegetable nutritional powerhouses like spinach, squash, and onions so you can feel good about it too.

I’m not going to lie to you, it’s a long recipe and it has a number of steps—but when you get right down to it, it’s really pretty easy. You can do it and when you do, you’ll feel like you’re the next Alton Brown! That’s my favorite part of trying new challenging recipes, that instant gratification for challenging yourself and succeeding. Plus you get to eat the results so that isn’t half bad either.

Beer and Butternut Squash Mac and Cheese from Kiwi and Peach

Beer and Butternut Squash Mac and Cheese

serves 4

{My inspiration for this one came from Amanda over at The Marshalls Abroad. I loved her idea of using the butternut squash as a thickener for mac and cheese. While I stuck with her method for making the squash roux, the rest of the recipe is my own.}

The Roux
1/2 of a large butternut squash
drizzle of olive oil
dash of sea salt
3/4 cup milk

The Pasta
1/2 pound of whole wheat pasta {I recommend using shells or actual macaroni.}

The Mixers
1/2 of a large onion, diced
2 cloves of garlic
drizzle of olive oil
2 tsp sweet whole grain mustard
1 tsp black pepper
1 tsp nutmeg
1/4 tsp chili powder
dash of green pepper sauce
1/4 cup sour cream
1/2 cup beer {I recommend a dark, malty beer like a brown ale or a stout.}
3 ounces spinach

The Cheese
1 cup of a strong cheddar, shredded
1 cup of goat cheese

The Crumble
4 ounces crackers {I use the Trader Joe’s multigrain ones that kind of look like Ritz.}
1 1/2 tbsp butter

First things first. Fire up the oven to 400°F/200°C and boil your kettle.

You only need half of a large squash so go ahead, cut it in half, and put the other half away. Scoop out the seeds then peel the half you are using and cut it into 1/2 inch cubes. Spread the cubed squash out on a parchment paper lined baking sheet and drizzle with olive oil and salt. Give it a stir until all the squash is coated, and pop it in the oven to roast for 30 minutes.

In a stock pot on medium heat, let’s get your pasta on to cook. I usually knock a couple minutes off the cooking time because the pasta will keep cooking while the mac and cheese is baking later. Don’t forget to salt your water! When the pasta is finished, pour the pasta into a strainer to drain the water and set it to the side. Return the pot to the heat.

While the pasta is cooking, I use that opportunity to dice my onion and peel my garlic. Once the pot is back on the stove, drizzle a bit of olive oil in the pot then toss in your onions and press your garlic. Cook for 4-5 minutes until the onions are starting to soften.

About this time the squash will finish roasting. While the onions and garlic are cooking, take the squash out of the oven and transfer it to your food processor. Add the milk and then puree to make the roux.

Reduce the temperature on the oven to 350°F/180°C.

Add the squash roux to the onions and garlic in the stock pot then start adding the mixers. The mixers are there for flavor, so feel free to substitute if you don’t have a particular ingredient or if you’re feeling creative. Do be mindful though of the wet ingredient ratios—they’re kind of important. The last thing you want is a too dry or too soupy mac and cheese.

Once the mixers are in, let it simmer for a few minutes to give the flavors some time to settle in.

While it’s simmering away, grate your cheeses and make the crumble. For the crumble, I put my crackers in a ziploc bag and take the rolling pin to it. In a bowl, melt the butter then add the cracker crumbs to it. Using a fork press the crumbs into the butter until all of the butter is absorbed evenly.

Remove the pot from the heat. Remember the pasta? Go grab that and stir it in to the mix. While you’re at it, add the cheeses too. Keep stirring until the cheeses have melted and the pasta is evenly coated.

Pour the mixture into a baking dish and top it evenly with the crumble. Pop it in the oven and bake for 30 minutes. You’ll know it’s ready when the crumble is browning and the mac and cheese is bubbling. Take it out and let it cool for about 5 minutes to let it set, then dig in!

Beer and Butternut Squash Mac and Cheese from Kiwi and Peach

Friday Food News

Sweet friends! We’ve made it through the week! How are you celebrating?

We are taking advantage of the long weekend and heading up to DC to spend time with some friends from Munich. One of those friends has joined the Peace Corps and is leaving in couple weeks to go to Azerbaijan for two years. Have I mentioned that she rocks? We are so grateful for the opportunity to see her before she heads off.

If you’re taking it easy this weekend and in the mood for reading, here are some things I’ve seen around the web lately. Have a good weekend!

Food News from Kiwi and PeachDooley ‘helping’ me shoot the Sweet Potato Bisque.

You might want to grab a cup a tea and take some time with this one. A critique of Perlmutter’s Grain Brain hypothesis:
“When a person advocates radical change on the order of eliminating one of the three macronutrient groups from our diets, the burden of proof should be enormous.” {james hamblin for the atlantic}

Have you been to an Aldi? A funny read about the German grocery experience. Now, if only they imported the beer too. {slate}

Our goal for the new year is to incorporate fish into our weekly meal plans, but I’m a fish novice. These killer recipes look doable and delicious. {the kitchn}

Michael Pollan and some other good folks are doing a fascinating lecture series. You can watch the lectures online, but you do have to reserve a spot. {edible schoolyard}

The Kiwi deems the microwave a must, so it’s interesting to see how this family is making do without. {the kitchn}

I’m on the hunt for a functional and affordable kitchen cart. I’m loving what Kristen did with this plain-Jane Ikea cart. {the hunted interior}

Now that I can get my hands on some kale, I can’t wait to try this recipe. I also second her feelings on the kale fad. It’s a dark leafy green. It’s incredibly good for you. There are worse fads. {a house in the hills}

Great advice for what to look for in a recipe to know if it’s a good one—because no one has time for duds. {dinner a love story}

Lemon bars are my favorite. {joy the baker}

This lettering. That hunker down banner. I die. {mary kate mcdevitt}

Speaking of lettering…have you checked out our new PRINT page yet? We now have free printables of some of my hand lettered art prints! There is nothing like instant art to freshen up your home, am I right? So head over and start downloading. {If you do, shoot me a tweet or instagram of what you did with it. I’d love to see it in action!}

Sweet Potato Bisque

My name is Lauren, and I have a problem. That problem is…the sweet potato.

I tell myself, “Self, it’s time to cut back on the SweePot or you’ll turn orange like Arnold on that episode of The Magic School Bus.” Never mind that it’s a cartoon or that he was actually eating some type of processed, carrot-based puff snack—regardless of the facts, Arnie was a warning to us all. But I digress…

Here’s the thing though, when you find that magic ingredient that everyone in your house loves, that is really great with a variety of different flavors, and that you understand the science of how to cook it and what its doing for you nutritionally inside and out… well its hard to make the switch.

I know I’m not alone in this. Do you go through phases with specific ingredients? What ingredient are you on a roll with right now?

Thankfully, we moved to the right state for my sweet potato obsession. North Carolina loves the sweet potato. Our first weekend here, we set out on a journey to find the Farmer’s Market to procure the necessary produce for the week. Approximately 5 minutes later we pulled up to the barn {we’re so close!} and collected our haul. Despite not being on my list, some how a few sweet potatoes ended up in my basket. I didn’t have a plan for potatoes per se, but I knew they’d get used and they were calling to me.

Sure enough, a few nights later after a crazy day of organizing and being on the phone with insurance for, I kid you not, 4 hours, I wanted something easy, something simple for dinner. Having a plan for dinner is great and usually we stick to it, but some days you just have to back up and punt. Anything that required thinking wasn’t happening that night. So with that mindset, this little soup was born. Thank God I had that sweet potato. It took less than 30 minutes, only one pot, and absolutely hit the spot.

Sweet Potato Bisque from Kiwi and Peach

Sweet Potato Bisque

{serves two}

To Boil
1 large {or two small} sweet potatoes
2 cups water

The Add-Ins
1 cup almond milk
1/4 cup shredded coconut
1 Tbsp maple syrup
1 Tbsp honey
1 tsp salt
1/4 tsp fresh ground black pepper
1/4 tsp cinnamon
dash of nutmeg
dash of ginger

Peel and dice your sweet potato into 1/2in cubes. Toss them into a pot along with your water and on medium heat and let it cook away for 20 minutes.

When the potatoes are soft, remove the pot from the heat and mash them. Add the rest of the ingredients, stir well, and return to the heat. Let it simmer for about 5 minutes just to combine those flavors and make sure everything in warm.

Last time I made this, in a fit of genius I decided to top it with goat cheese and crumbled bacon. Clearly it’s no longer vegetarian or dairy free at that point, but eh… it was freaking delicious. The earthy goat cheese and salty bacon were the perfect complements to the soup’s sweet and spicy. We’ve also been known to serve it with cornbread or a slice of toasted whole wheat sourdough.

Grow.

Hello. Is this thing on?

I hope you all had a fantastic break for the holidays—full of  good food and quality time with the folks you love. I know that we sure did. Just after the Christmas festivities were winding down, we packed up the U-Haul and made the move to Asheville. We’re just about settled in to the new home and are having so much fun exploring Asheville and getting to know our new town.

2013 was the year of travel, rolling with the punches, and figuring things out. 2014 is going to be the year of putting down roots and growing, blooming. {While still rolling with the punches because, let’s be real, there will always be some punches.}

As the mess from the move settles down, I’m looking forward to getting back in the blogging swing for the new year. This is going to be a big year of growth for Kiwi+Peach and we are pretty pumped about the things we have planned for the year. Sharing tried and true recipes and talking about food will always be our main focus, but we’re branching out a bit. We are going to dive a little deeper into the science behind the food we eat, and we will be sharing our monthly meal planning calendar. I’ll be doing more calligraphy and dabbling in a bit of graphic design to share my original artwork with y’all. We are also going to be sharing some of the things we’ve done/are doing to create a home that is beautiful, efficient, and eco-friendly.

My goal, the whole reason I write, is to share experiences. I always want to be producing something of value for you, so I strive for the tips, tricks, inspiration, and knowledge we share about how we do life to be stuff that you could actually use. Hearing about your experiences makes my freaking day y’all. I want to start a conversation, to connect. I want to hear about your experiences your thoughts, feelings, smart remarks. That way, we grow together.

I recently saw a thing circulating round the web about picking one word for the year. It’s not so much a resolution as just an encompassing word to strive for and meditate on for the coming year that will help you focus {or re-focus} and reach your goals. So much better than a list of resolutions, I thought, so I bit.

My word for the year is…

Grow: Lettering by Kiwi and Peach

We’ve planted ourselves here, so now its time to grow.

It’s time to grow; personally, professionally, in our relationships, this blog, and quite literally, a garden.

Growth doesn’t happen on its own. It takes intentional, focused effort. It takes trying new things, even if they’re scary. It takes risk and putting ourselves out there, even if it means being a little vulnerable. It takes research and constant learning to develop new skills, even if it takes a little trial and error. It takes a lot of hard work, but it will be so worth it.

What about you? What’s your word for the year? Don’t have a word? Then what is that you are striving for this year? How can we help each other keep our eye on the prize?

Fan of the ‘Grow’ image?

First of all, thank you! I made it m’self, hand lettering and all. Second of all, you’re in luck because it is available for free on our brand spanking new PRINT page, or you can click here to open the printable {and downloadable} pdf. Print it out, pop it in a simple frame, and you have a piece of inspirational artwork for your home that reminds you to keep growing.

Kiwi+Peach on The Green Life

Hey guys. We are still on our mini-holiday break while we get everything thing sorted and settled with the big move, but I couldn’t resist popping in today and sharing some awesome-sauce news.

If you head over to The Sierra Club’s blog The Green Life, you’re going to see a recipe for Sweet Potato Quinoa Chili from yours truly featured on their article 3 Hot Soups for National Soup Month. The other two look d.e.l.i.c.i.o.u.s as well! So head on over, give them some love, make a big pot of that chili, and STAY WARM!

I’ll be getting back into the swing of things on here next Monday. In the meantime though, I’m going to go build a cart for my kitchen. Cheers.

Sweet Potato Quinoa Chili from Kiwi and Peach

Oliebollen: A New Year Staple

It wouldn’t be New Year’s without Oliebollen!

Lauren has turned the blog over to me {the Kiwi} for the day to tell y’all about this Dutch New Year’s Eve tradition which, alongside the excellent Apple Cake, is one of the many perks of having Dutch grandparents. The name Oliebollen literally means “oil balls”, but don’t let that put you off—they’re essentially a deep-fried fruit dumpling, a bit like a doughnut. When I was young, my grandmother used to make them every New Year’s Eve without fail. When she was no longer able to do so, the mantle passed to my uncle. Despite not being Dutch himself, he threw himself into the task of developing the perfect oliebol with an energy reminiscent of my later {successful} quest to master Southern Biscuits.

Last year at this time we were in New Zealand, and thus able to sample the delicacy for the first time in 3 years. Now we are half a world away again, and after the second or third emailed photograph {sent deliberately, I suspect, to torture me} I decided to just make my own. The results were not up to the level of a practiced master in terms of shape, but they were better than adequate. Not bad for a first effort! This recipe is adapted from my uncle’s—chiefly in reducing it by a factor of four{!}—which was in turn adapted from my grandmother’s.

The term “mixed fruit” will be familiar to fellow Kiwis as a ready-made confection of raisins, sultanas, currants and dried orange peel that is available in any supermarket. {Avoid the ones containing fake cherries though, which is most of them.} You can make your own by just combining those individual ingredients. I just used whatever we had lying around, which happened to be raisins and dried cranberries. Note that this fruit has to be soaked for at least 8 hours before you begin, so start early.

The key to success, I am reliably informed, is to keep the temperature of the oil low enough to cook the oliebollen all the way through before the outside is burned to a crisp.

Oliebollen: A New Year Staple from Kiwi and Peach

Oliebollen

{makes about 8}

250g {½ lb} mixed fruit
½ cup milk
¼ cup warm water
1¾ cups plain flour
1½ tsp sugar
7.5g {¼ oz} butter
15g {½ oz} dry yeast
¼ egg {about a teaspoon once it’s beaten}
squirt of lemon juice
about 1L {1 quart} canola oil or other vegetable oil {I used rice bran oil.}

Wash and then soak the mixed fruit in water overnight {or for at least 8 hours}.

Preheat your oven to around 100°C/220°F.

Pour the milk and water into a large mixing bowl. The resulting liquid needs to be lukewarm—though be sure to keep it below 40°C/100°F, otherwise it will kill the yeast.

Beat the egg and melt the butter. Stirring in one direction only, add the flour, sugar, egg, butter and lemon juice into the milk and water. Drain the water from the fruit and stir that through as well. The resulting mixture should be sloppy, but not runny since you have to form it into balls later. If it’s not quite right, add a little extra milk or flour as required. Finally, stir in the yeast.

Switch the oven off. Cover the bowl with a clean, moist tea-towel and place it in the warm oven for 25-30 minutes, until the mixture has roughly doubled in size. While the dough is rising, begin heating the cooking oil to a moderate heat. {I set the dial exactly halfway on the stove, and it turned out perfect.} You’ll be deep-frying, so try to use a pot with a fairly small base to minimise the amount of oil you need.

When both the dough and the oil are ready, you can begin frying the oliebollen. Scoop the batter into round balls using a large tablespoon and a rubber spatula. Fry them until golden brown {not dark brown}. They will continue cooking for a little while after you remove them from the pot, so it’s OK to take them out when they are still slightly undercooked. Use a kebab skewer or similar implement to check if they are done.

Oliebollen are best served warm and fresh, though if you’re making a double or quadruple batch you can, and we usually do, keep them in the fridge for several days. {They can be reheated in the microwave too, though not without introducing a little bit of sogginess.} Sprinkle them with icing sugar {aka powdered sugar, or confectioners sugar} through a sieve before eating.