Community Supported Agriculture

Hey there friends! How was your weekend? Did you make the preserved lemons? What did you think?

The Kiwi and I went down to Georgia to run in our very first 5k. We both run pretty regularly, but neither of us had much desire to do it competitively. My dad, however, is very much a competitive runner. Last Father’s Day, in a moment of insanity, I volunteered to run a race with him. Thankfully we were still in Germany, so that bought us a long time before we actually had to do it, but Saturday, Race Day had arrived. Overall, we were really pleased. I set a new PR and the Kiwi got 2nd in his age group! Not bad for a first go at the whole race thing.

Also exciting, we got our confirmation from Blue Meadow Farms, and I am so incredibly pumped to be a part of their CSA this year. This is our first time doing one and I sure am excited to see what Blue Meadow Farms has in store for us!

As I’m sure most of y’all know, CSA stands for community supported agriculture and is an arrangement where you’re basically buying into shares of a farm’s harvest. The money you put in helps cover the operational costs of running a farm for the season and in turn you get a share of the harvest. It’s a great way to support and get to know local farmers and to get local, organic produce on the cheap.

We really like our fruits and veggies so fresh produce tends to eat up our weekly grocery budget—organic produce at the likes of Whole Foods and EarthFare isn’t cheap my friends. For what we spend in total on three weeks of groceries, we will get fresh produce every week for six months. That breaks down to less than $15 a week which is way less than what we spend on produce and if that isn’t a great deal, I don’t know what is.

Being a part of a CSA is also a great way to know what’s in season. In the land of plenty, we can get anything we want at any time of  the year, but just because we can doesn’t mean we should. Produce that is in season is always going to taste better than the stuff that’s been in cold storage. Because of the constant cycle, eating close to nature this way also ensures you don’t get burnt out on certain foods.

If you’re in the WNC area and looking for a CSA, Blue Meadow Farms is still taking members, so be sure to go check them out. If you’re not in our area, you can visit LocalHarvest and find a CSA near you that will fit your family’s needs. Since we are just a family of two, we opted for a half-share that is delivered every week, but each CSA is different. There are usually lots of CSA options in any given area, so just do your research and pick the one that works best for you. I really want to encourage you to at least check it out. Run the math and see how much you can save by eating locally and getting great quality produce from the folks just down the road from you that are growing food.

Aside from saving a wee bit of moolah, I’m also really excited about getting produce in our box that I might not have otherwise bought. I am looking forward to stretching my creativity and coming up with some ballin’ new recipes! That means y’all get new recipes too, so really everyone is a winner here.

Have you guys ever participated in a CSA? What did you love about it? Any surprise veggies?!

Now that spring has sprung, if you’re needing some inspiration on the veggie heavy dinner front, here are some of our favorites from the archives:

Kiwi+Peach: Quinoa Stir FryQuinoa Stir Fry

Watermelon, Feta, and Mint Salad from Kiwi and PeachWatermelon, Mint, and Feta Salad

Kiwi+Peach: Lauren's Summer Favourite {written by the Kiwi}The Summer Favourite
{Sauteed Eggplant, Zucchini, and Bell Peppers in a Coconut Cream Sauce}

Kiwi+Peach: Strawberry Red, White, and Blue Cheese SaladStrawberry and Blue Cheese Salad

Kiwi+Peach: Veggie Drawer PastaVeggie Drawer Pasta

Kiwi+Peach: Chicken and Veggie KabobsPineapple Glazed Chicken Kebabs

Preserved Lemons

A natural extension of not buying super processed pantry items is a foray into canning and preserving. I’ve been a bit lazy because there are TONS of local, ‘homemade’ options available here in Asheville that are made by people who think the same way we do about food. From watching my grandmother do it year after year, the canning process takes lots of work! Why do it myself when I can support local businesses by buying from these folks? Because, it’s a skill, and skills and their concepts are great things to understand. Plus, I’m just curious.

My desire to learn how to preserve food has been fermenting for a while {pun very much intended}, but something keeps stopping me. The truth—I’m scared, way scared. Terrified is probably a more accurate word. Botulism is no joke and this food safety, food-bourne-illness-germaphobe has some real issues trusting that I’m not going to kill my whole family with blueberry preserves. Real issues.

Shortly after our trip to Morocco, the Kiwi started begging me to give Moroccan food a go at home. The food we had in Morocco was out of this world flavorful, so I started doing some research and found preserved lemons in loads of the recipes. Thus began my search for preserved lemons so that I could put that tajine I got Zane for Christmas to good use. I love our local makers, but I haven’t seen preserved lemons here. Probably because most of us didn’t know they were a thing or maybe we think we have no need for them in our cooking. Unless you’ve tried them, you might think the same thing. But just you wait…

Anyway, where was I?

Oh right, I needed preserved lemons but couldn’t find any. I’d been chatting to an experienced food preserver about my desire to learn, the advice was always the same—start with something easy and something highly acidic. I saw Sarah’s post on how she made her own preserved lemons in only a week as opposed to the month it takes to make the real deal and thought that would be just the ticket! It looked so easy! So on a whim and high bout of self-confidence, I embarked on making my hacker version of preserved lemons. Seriously, it’s so simple a kindergartener could do it; well, a kindergartener you trust with a large chef’s knife…

Preserved Lemons from Kiwi and Peach

Preserved Lemons

4-5 organic lemons
around 1/4 cup of sea salt
pint sized canning jar

Scrub your lemons as well as you possible can and then dry them.

As thinly as your knife skills will allow, slice your lemons. As you’re slicing, pick out any seeds from your lemon rounds. Also, sit the ends to the side. We’ll be using them later.

Make sure that the jar you are using has been thoroughly washed with hot, hot, hot water and dried. Alternatively layer the lemon slices with a healthy amount of sea salt between each layer. You will rinse the salt off later when you use them in your cooking, so don’t skimp! It’s important! Pack the layers as tightly as you can, pushing down regularly as you go.

Stop a couple inches from the top and squeeze the juice from the ends into the jar then use the ends to push down and pack the layers really tightly. The goal is for any gap to be filled with juice. You can then toss the ends and put the lid on the jar.

Store it in your cupboard or a cool dark place for a week. You’ll know it’s ready when the rinds are soft.

And there you have it! Preserved lemons that will make you feel oh so fancy!

Once opened, I stored my jar in the fridge and it’s become my super quick go-to for recipes that call for lemon juice. I just sub in three or four rounds, depending on the size, per lemon. It’s been great in some of our older recipes like the pesto and avocado pasta, but it has also led to some wonderful new recipes! Now I just have to tackle the tajine…

chili {perfected}

Holy snow Batman! I thought I’d have to wait until the fall to share this one with y’all, but round three of ‘the vortex’ begged me to reconsider.

Since the beginning of our journey to eliminate processed foods, I’ve had a vice. My ultimate comfort food is my mom’s chili and my mom’s chili is what it is because of the chili seasoning she uses. The chili seasoning she uses comes in a little yellow packet and along with the usual suspects there were lots of extra man-made chemicals and processed corn product in there as well. I pretended they weren’t there.

Of course we couldn’t get it in Germany, but my mom would supply me with packets regularly in the mail and it was like a little taste of home every time. I had to get honest. Deep down I knew that little packet was exactly what we were trying to vanquish from our house and if there was ever a time to learn to make my own it was then.

So we ate chili, lots and lots of chili, and eventually, I nailed it. I know that chili can be a heated topic of debate. Some folks might object to my bean-filled pot, and that is fine—I object to your bean-free concoction. To each his own. If you are in the chili-with-beans camp though, and even if you aren’t {come over to the dark side y’all}, I promise this rezept won’t disappoint.

Every family seems to have their own chili recipe. I’m curious, what kind of chili did you grow up eating? 

{perfected} Three Bean Chili from Kiwi and Peach

Three Bean Chili

{makes about 6 servings}

for the seasoning:
2 Tbsp chili powder
2 tsp cumin
1/2 tsp cayenne pepper
1/2 tsp garlic powder
1 tsp onion powder
1 tsp whole wheat flour
2 tsp salt
1/4 tsp fresh ground black pepper
1/2 tsp cinnamon

for the chili:
1 lb grass-fed ground beef
1 medium white onion
1 clove of garlic
1 can black beans
1 can kidney beans
1 can pinto beans
1 (big) can diced tomatoes
1 can of tomato paste
2 cups of stock {Chicken, veggie, or beef will do. Beer works well too.}

{If you are a dried bean user, measure out about 1/4 cup of each type of bean. Go ahead and soak them overnight and cook them for about an hour before you add them to the chili.}

Mix up your seasoning in a small bowl. This recipe will make about 4 Tbsp of season and you will use all of it in the chili.

Start heating up your skillet on medium heat. While it’s getting hot, dice your onion and get the garlic ready to press. Once the skillet is hot, crumble your ground beef into it and give it a stir. Sprinkle a tablespoon of the seasoning over the meat and work it into the meat. Once a little of the fat has cooked out of the meat, add your onions and press the garlic into the mixture. Stir well and let it cook until the meat is no longer pink and the onions are soft, about 7-8 minutes.

Once the meat and onions are to your liking, transfer them to a 4 qt stock pot on medium heat. Add the beans, the whole can of tomatoes which you’ve crushed by hand—liquid and all, tomato paste, and the rest of the seasoning.

Stir everything in really well making sure that the tomato paste has dissolved and is completely incorporated. Add the stock and bring the whole shebang to a boil. At that point, reduce the heat to low and let it simmer for at least an hour but up to 3 hours. The longer you can leave it, the longer the flavors will have to get to know each other. If you want to leave it for longer than 3 hours, just add a bit more liquid.

Build Your Own King Slat Bed for $150

The Kiwi is here today to tell y’all all about the time we decided to build our own king-size bed. In our search for the perfect bed, I fell in love with West Elm’s Boerum Bed Frame. Unfortunately, it was a bit out of our budget. So, being the hero he is, The Kiwi sketched up some plans and a few trips to the hardware store later, I’m writing this on my very own Boerum-style bed for a third of the cost! 


When we moved from Germany to the U.S. at the end of last year, we were fortunate that Lauren already owned a car and a houselot of furniture here. That left a bed as our one major essential purchase—I am considerably taller than a double (or, as they’re quaintly called in America, ‘full’) bed is long, and after Germany’s king-size-as-standard that was not going to cut it.

One thing I was already sure about is that I wanted a slat bed. This is what I had back in New Zealand (with an inner-spring mattress), and both of the beds that we had in Germany (with high-density foam mattresses). Slat beds are, as far as I can tell, better in every way than box-spring bases. Unlike box springs, they don’t wear out and are not ugly. They’re also a lot lower-profile, so for the same height of bed you get a lot more space to stock up on toilet paper, whiskey, and other fungible goods to barter with in the event of the collapse of the global monetary system (as one of our friends in Germany does), or just for your crazy dog who likes to lie under things, even if it means occasionally getting stuck and needing rescue at 3am. For instance.

Slat beds are ubiquitous in Europe, and becoming increasingly popular in New Zealand. In America, however, they remains somewhat unusual. As evidence of this, search for them on the Internet and you’re bound to find at least one person recommending that you just slip a sheet of plywood under your mattress and get all the benefits of a slat bed, with a bunch of replies from people saying that worked great for them. Do NOT put plywood under your mattress. Mattresses need to breathe, and if you don’t give them a chance you’ll start growing the sort of mould that at best might start producing neurotoxins that put you afoul of international chemical weapons treaties, and at worst could spontaneously self-organise into some sort of Lovecraftian horror. Just say no, for Cthulhu’s sake.

Naturally our first thought was to simply buy a bed. Research revealed that our options were limited to a nice-ish wooden bed from for around $450, or an Ikea laminate monstrosity for more like $275. After lengthy consideration, we decided to bite the bullet and get the nicer one. Then we discovered that the $50 Internet ‘delivery’ charge applied even if you picked up the bed from the store rather than get it delivered. Once we started going through the checkout process online, it transpired there was another $50 delivery charge to get it delivered to where we actually were, since the store didn’t have any in stock that you could pick up there anyway. We probably should have remembered that it’s perfectly normal here to advertise prices that don’t include the tax you have to pay, but having spent all but one year of my life in countries where it is most definitely illegal, I hadn’t. Neither had Lauren—we can both testify to how easy it is to forget how your own country works in only a couple of years. Now more than 30% over our already-stretched budget, we balked, abandoned the Kafkaesque website checkout and its misleading pricing and headed for the hardware store to size up our options. How hard could it be to build a bed?

The result cost about half as much as the Ikea option in materials (the $150 figure, by the way, includes sales tax), probably still worked out cheaper than the solid wood bed even if you attached a significant cost to our time, and looks better than either if I may say so myself. I’d estimate that we put about three half-days of work into it in the lead-up to Christmas. (Unless your body is used to this particular kind of physical work—in which case you probably don’t need this post—I would not recommend trying to force a shorter schedule.) This blog is mostly about food, but today you get a recipe for a bed that you should be able to repeat yourself, without the hassle of trying to design it yourself or the 3 return trips to the hardware store as it changed over time.
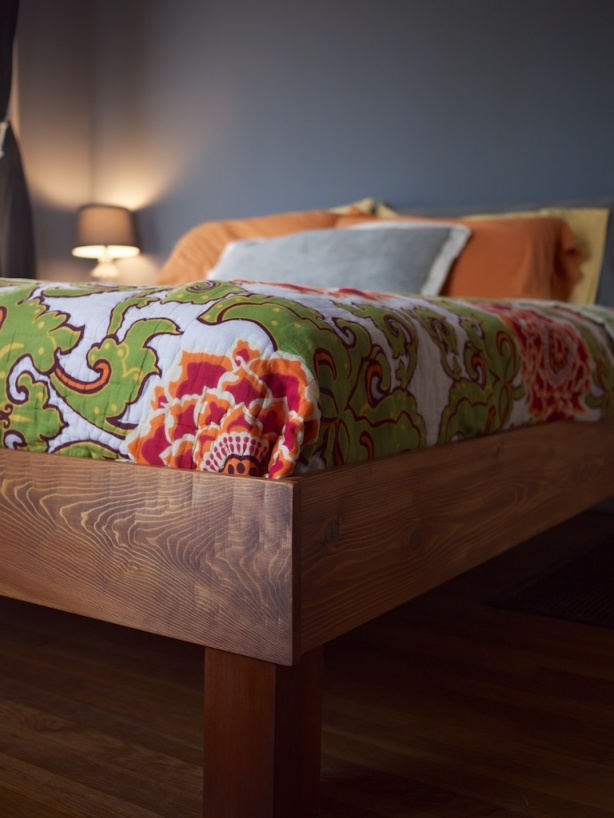
Build Your Own King Slat Bed for $150 from Kiwi and Peach

King Size Slat Bed

Timber:

Lengthwise Crosswise Vertical
4″ × 4″ Cedar 6 × 8″
8″ × 0.75″ Cedar 2 × 80″ 2 × 78½”
3″ × 1″ 15 × 75″
2″ × 2″ 2 × 77″
4″ × 2″ 1 × 80″
2″ × 1″ 28 × 3″

Note that the dimensions given for wood are always the rough-sawn sizes. You want to buy dressed timber, so while these are the sizes you’ll see labeled, if you measure them you’ll find they’re considerably smaller. Use only untreated timber, and make sure you select pieces without any noticeable kinks or twists, which can make your life a living hell. The hardware store will likely be able to cut everything to length for you for free, but they’ll mostly likely not be able to rip anything down to a smaller size, so make sure you find material with the dimensions you want. Hang on to the offcuts, there will be uses for those too.

Fasteners:

  • 8 Corner brackets
  • 60 ⅝” wood screws
  • 50 2″ #8 wood screws
  • 12 3″ #10 wood screws
  • Wood glue (e.g. Liquid Nails)

Tools:

  • handsaw
  • electric drill,
  • spirit level
  • square
  • caulking gun
  • sandpaper
  • vise (optional but very handy for the sanding and sawing)

Your first, and perhaps most arduous, task is to sand down all of the external parts of the bed. This is essential for a smooth finish, as even dressed boards will have tool marks, rough patches and grain in relief (and the grain will be brought out even more when you stain it). My obsession with sanding has earned me a reputation that will take years to live down, but it’s worth it. Sand thoroughly first with a medium-coarse ~120 grit paper, then remove the artifacts left by that using a fine 220 grit paper.

In our case, the cedar planks were dressed only on one side, and that was fine—we just used that side as the outside. Don’t bother giving the inside anything more than a quick once-over, except for a couple of inches at either end of the head and foot boards, which will overlap the side boards and be visible. The legs were not dressed at all, and thus required the most work (the vise was handy at this point—use a couple of the offcuts from the slats to avoid damaging the timber in the jaws). Don’t forget about the ends—sand some 45° chamfers first to avoid splits, since it’s practically impossible to work with the grain on the end grain. Round off all the edges and corners as you go, because they’ll be the things attacking your shins and toes in the dead of night for the rest of your life.

You could stain the wood at this point, but there’s a risk of damage as you continue to build the bed. In most cases you’ll be building the bed in a different room to the one where you want it, so you’ll have to disassemble it at some point anyway and that is the best time to stain. In our case those rooms were about 250 miles apart, but even if they’re as close as your bedroom and your garage, that won’t help you get a King-size bed through the door.

The two 2″ × 2″ rails are going to sit on the legs and bear the main weight of the bed. Begin by screwing them (with the 2″ screws) to the insides of the two side (i.e. lengthwise) planks, flush with the bottom edge and equidistant from each end. About 5 screws in each should be plenty to hold them. (Edit: It turns out that there is considerable force transfer from the rails to the sides, Cedar is a pretty soft wood, and the sides don’t offer a lot of depth for the screws to bite. To avoid developing future squeaks, more screws are better and glue is recommended too.) Put at least 20 or so screws in each side. If you favour the belt-and-braces approach you can glue them first as well. We didn’t because we were making it up as we went along and not sure that we would get it 100% right first time. Cut the offcuts into four ~4″ sections and fix them to the head and foot planks around 3″ from the ends. These allow you to stand those boards upright while you work, and give you something to screw to the legs later.

The corners use an overlapping joint design, because that is the easiest thing to get looking good with minimal carpentry skill. The nicest-looking joints are of course the dovetail or mortice and tenon, but those require enormous amounts of skill (and equipment) to get right. A simple butt joint has to line up exactly to avoid looking badly made, whereas an obviously-intentional overlap hides a multitude of sins.

Build Your Own King Slat Bed from Kiwi and Peach

Assemble the four cedar planks into a bed shape, with the head and foot boards protruding beyond the sides. The interior width of the bed should be 76″. Using the square and level, square up the corners and screw two angle brackets into each one. This is, of course, much harder than it sounds. It pays not to completely tighten the screws until you have worked your way around all four corners. Place the center rail down the centre and attach it to the head and foot boards with an angle bracket at each end too.

Build Your Own King Slat Bed from Kiwi and Peach    Build Your Own King Slat Bed from Kiwi and Peach

Now lift the whole thing up and place a leg under each corner (invite your friends!), and the remaining two legs under the centre rail, about a third of the way in or wherever you like. Make sure everything is level again, then screw the two side rails and the centre rail into the legs using the long screws. These ones will need to be pre-drilled. Don’t screw the short sections of rail on the head and foot boards into the legs yet, since you’re just about to have to take it all apart anyway. Use two screws for each of the legs on the centre rail. It pays to do all of this on a flat surface, but once of the great things about wood as a material is that if you get it close enough, it will adjust to the correct shape under its own weight. Don’t work on a hard surface like concrete, though, because you’re likely to damage the finish. Some old carpet without underlay is ideal.

Arrange your slats across the bed. It looks like a bed! Take your 3″ sections of 2″×1″ and place them along the rails between the slats to space them, then carefully remove the slats and mark the positions of the spacers with a pencil. I just cut these with a handsaw, because it seemed cruel to ask the hardware store guy to do so many. If I hadn’t been feeling lazy at the time, I would have cleaned up the edges with some coarse sandpaper. Glue the spacers to the rails. We used Liquid Nails. Before the glue dries, put the slats back and make sure they all still fit. Adjust as necessary. Then remove them again so you don’t accidentally glue them down.
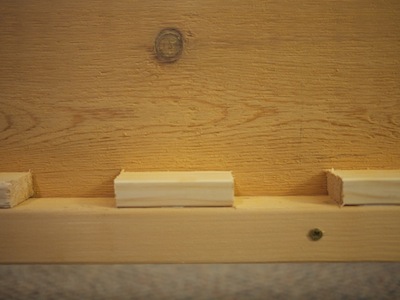
Build Your Own King Slat Bed from Kiwi and Peach     Build Your Own King Slat Bed from Kiwi and Peach

It’s time to stain the bed. The exact colour was a cause of heated debate between us. Lauren want it really dark so as to hide the beautiful grain and colour of the wood and make it look like the fake-mahogany-but-actually-obviously-MDF furniture you see in every American furniture store. Whereas I wanted to use a light touch, more like the light pine furniture and floors and ceilings and walls that we were so thoroughly sick of in Germany. We both reluctantly compromised on Varathane’s ‘Provincial’ (beware: these names are in no way, shape or form standardised across stain producers), but as soon as we saw it we both agreed that the colour was completely perfect after one coat. Ideally you’d want to get to perfect after two coats, but we weren’t going to risk it.

Disassemble the bed by removing the two ends. Leave the legs attached to the sides. Then apply the stain to all of the cedar parts. Don’t bother about the inside other than the top couple of inches, because the unfinished surface will really drink up the stain (which can possibly lead to warping). You’ll probably want to let it dry for a day or so between coats, and for a couple of days after the second coat before using it. We used those disposable foam brushes and they were great, despite the tendency of the handles to come apart.
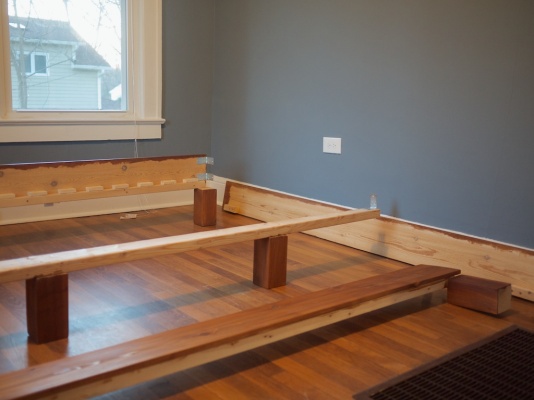
Build Your Own King Slat Bed from Kiwi and Peach

You’re basically done. Reassemble the bed in the room you actually want it in. If you’re transporting it first, be sure to wrap everything in blankets to avoid damaging the finish. With all the screw-holes already made, it should be a quick matter to reattach all the brackets. Real beds use a two-part bracket arrangement to make this step a little easier, where each part screws in to one side and then the two bolt together. I don’t know where to find those here though, so the angle brackets did the trick. Pre-drill and then screw in the short rail offcuts on the ends to the legs.

Build Your Own King Slat Bed from Kiwi and Peach

You’ll probably want to either varnish the surface with polyurethane or wax it to seal it at some point (give the stain a good few days to dry first though). We haven’t done ours yet, but will at some point in the next month or so when our bookcase arrives.

Replace the slats. Just to add a little stiffness, screw down the first, last and centre slats to the rails on each side. Since this will necessarily be very close to the ends, pre-drill the holes to avoid splitting the slats.

That’s it! You have a bed! Just drop in a mattress and you are good to go. Be aware when you’re shopping that a mattress sitting on a slat bed will be somewhat firmer than when it is on a box spring, so take that into account. We got a lot better deal—read, half the price—from a local country furniture store than at any of the five franchises of a single national chain that are inexplicably clustered on a half-mile stretch of the same road here.

The end result is beautiful, functional, and can offer the satisfaction of going to sleep every night knowing that you built it yourself. Enjoy!

Build Your Own King Slat Bed for $150 from Kiwi and Peach

A few notes:

The bed that really stretches the limits of material strength is not the king, but the queen. A king-size bed is so wide that you have no choice but to include a centre rail with its own legs, reducing it to the equivalent of two king singles in terms of weight distribution. So if you try to scale this bed down you can remove the centre rail, but not without increasing the strength of the slats. (I would use 4″×2″/100×50mm slats for a queen size bed.)

We have vague plans to build our own headboard some day that will attach inside the bed. If you want to do the same, add a couple of inches to the lengths of all the lengthwise members.


Just a few more weeks to sign up for our meal planning service, The Seasonal Supper! Our first collections roll out on June 1st, and I know you don’t want to miss out on a single day of fresh, seasonal recipes and loads of meal planning tools. At just $19.99 a season for four weeks of recipes, meal line-ups, grocery lists, calendars as well as blank tools that you can tweak to make work for you and your life, it’s a steal!

join-now-button

The Pie Project

For Valentines Day the Kiwi gave me a cookbook. What can I say? The boy gets me.

The Four & Twenty Blackbirds Pie Book has been sitting in my amazon cart since it came out, but something kept stopping me. I’m picky when it comes to investing in cookbooks. There are millions and millions of recipes out there for free, so if I’m going to buy a cookbook, I expect a lot. I expect it to be something I will actually use. I expect recipes that are going to become staples. I expect to turn to it regularly for inspiration. I also expect more than just recipes. I want gorgeous inspiring pictures and thorough explanations of perfecting a technique. And while I thought this book would meet those expectations, it seemed too niche, too one use, and honestly, too much work.

I’m glad that boy knows my heart so well.

Malted Chocolate Pecan Pie from Kiwi and Peach

I have been talking about pie for a while now. I have stumbled my way into making some pretty edible pies in the past, but I wanted to learn how to get that perfect flaky crust every time. I wanted to know how to prepare the perfect filling and how to make beautiful latticed tops. I wanted to know the secrets to perfect pie making.

He wasn’t just giving me a cookbook; he was giving us a project. He was giving me his time and assistance to perfect a skill I’ve been wanting to learn.

Blushing Apple Pie from Kiwi and Peach

Folks across the States tend to celebrate today, 3.14, as Pi Day. Is it because we just really love non-repeating magical numbers? Maybe, but I bet it’s more because we get to eat pie. In case you’re at a loss for how to celebrate, head over to your local bookshop or you know, Amazon, and pick up a copy of the Four & Twenty Blackbirds Pie Book. Written by the Elsen sisters who run a pie shop in Brooklyn by the same name, the book walks you through their pie making process. The pies are seasonal and their focus is on using quality ingredients that are available locally. It’s a mark of a well written recipe that novices like us could make a perfect pie the first time. The explanations are straight-forward and easy to follow. They are also incredibly creative flavor pairing geniuses, so there’s that. You certainly won’t get bored with these flavors! Our first attempt was the Blushing Apple (which had a bit of beetroot in it) and it turned out better than either of us could imagine. Next came the Malted Chocolate Pecan which was a bit trickier with the pre-baking and all, but the end result was a home-run. During the ‘heat wave’ strawberries started turning up everywhere, so we snatched them up and made the Strawberry Balsamic before the weather turned again. This weekend we’ll be making the Salt Pork Apple Pie and seeing how many digits of pi we can recite. Cheers!

How are you celebrating Pi(e) Day? Have you checked this book out yet? Which one would you make?

Strawberry Balsamic Pie from Kiwi and Peach

{This post contains Amazon affiliate links. That means that if you head over to Amazon from those links and choose to buy the book, a tiny bit of the money you spent on the book will come back to me for the referral.} 

The Cooking Cure Week 1: Brekky

Have you heard about the Kitchn’s Cooking Cure?

They’re trying to help folks like me {and you} refresh their routines in the kitchen and get us cooking everyday. We’re reexamining our routines for breakfast, lunch, and dinner and pinpointing areas we where we’d like to see change. Last  week the focus was on breakfast.

The Kiwi and I have a pretty solid breakfast routine that we are totally happy with. Our regular breakfast repertoire consists of oatmeal, or as the Kiwi says porridge, on weekdays and a bowl full of my special homemade granola and yogurt at the weekend. Both provide the quickly-acessed fuel I need to go lay down a few miles at the park and it keeps us full until lunch time. I love our morning routine and neither of us are hankering to change it up that much. It’s only a rut if you’re tired of it right?

We might not be changing up our morning meals, but thinking about it definitely made me consider how it balances with the rest of what we eat and what it does for our bodies. It also made me reconsider my alarming dependency on that magical elixir, coffee. Something, candidly, I thought you would have to pry from my pickle juice covered hands whenever we decide to procreate. Taking the time to reflect on what you eat and why you’re eating it is a great exercise. You never know, you might surprise yourself.

Are you doing the Cooking Cure or have you ever done something like it? What revelations did you have?

Cinnamon Raisin Crunch Oatmeal from Kiwi and Peach

Cinnamon Raisin Crunch Porridge

{serves 2}

2/3 cup rolled oats
1 1/3 cup almond milk
1/4 cup raisins
big handful of chopped almonds
1/2 tsp cinnamon
dash of nutmeg

In a sauce pan on medium heat, start heating up the milk. Add the oats and raisins and bring it to a boil. Cook for 10 minutes or until most of the liquid has been absorbed or evaporated. While it’s cooking chop the almonds then go about your morning routine. When it’s finished, remove from the heat and stir in the almonds and cinnamon. Serve it up and top with a dash of nutmeg.

What We Won’t Eat

A few weeks ago my best friend made a comment about the blog to the effect of there must be so much that we don’t eat. Clearly this means I’ve done a poor job of explaining our food philosophy even to the folks we love and interact with regularly because nothing could be further from the truth. I’ve posted recipe after recipe on here and talked about eliminating processed foods, but I haven’t talked specifically about how we approach food, our food philosophy.

I used to think I knew a lot about nutrition as a science—after all, I did take multiple courses on it at university and then taught it to middle schoolers. But the more I read and the deeper I get, here’s what I’ve learned… no one knows anything for certain. Those who are most convinced otherwise have, historically, produced the worst advice. There are a ton of grand overarching (and overreaching) theories out there—some better than others. The science exists to factually demonstrate that certain foods are high in certain nutrients and from there people get into ‘good’ and ‘bad’ foods, and quickly on to my least favorite thing in the world: restrictions.

We do not restrict nutrient groups. We do not restrict food—real food—of any sort. In fact, Michael Pollan sums it up pretty well in this video:

“Eat anything you want, just cook it yourself.”

We eat meals made by human hands with real, whole ingredients.

The real, whole ingredients thing is key. We eat ethically raised meat, eggs, and dairy. We prefer to eat organic, non-GMO grains, fruits and vegetables. We buy it in the freshest, most ethical form we can get it and use it to make the food we eat.

Why? The more I read and deeper I get, I’ve also learned that there is an incredible amount of politics at play in the food choices we make. The Kiwi and I both care deeply and get a little fired up about those politics. We vote with our dollar to support the farmers that raise and grow our food, not the corporations that turn food into chemistry projects. We vote for food where as much as possible of the real cost of producing it is priced in, rather than externalized and pushed onto society as a whole in the form of massive environmental damage and widespread antibiotic resistance and huge government subsidies for unsustainable practices. That is what makes sense to us.

We believe that the lives the animals we eat have led will effect our health, so we eat meat from animals that led normal, antibiotic-free lives eating the diets they are adapted to eat. Anecdotally, prior to my foods classes at university I never knew there was anything other than grass-fed beef. I grew up on a farm in Georgia that raised beef cows. All they ever ate was grass. Biologically, any animal with a rumen is made to eat grass. Just because they can eat corn for a short period of time before becoming deathly ill doesn’t mean they should. In New Zealand or, for that matter, Germany and many other parts of the world, grain-fed beef is virtually unheard-of. All the beef is grass-fed and there is no need to distinguish or pay a premium for it.

We believe that the food we eat should not be far removed from nature because that is where it’s at its nutritional peak. We eat seasonally so that we can have fresh ingredients, and so that rather than pass the time in relentless monotony we mark the passage of our journey to a cadence older than the hills in which we make our home.

We’re not here to stand in judgement of anybody who doesn’t eat the way we do. It does take time and work to eat like this, and it often involves swimming against the tide of a market that has been distorted to give perverse pricing signals. The reason I write this blog is to provide you with tools to choose how you want to eat. I’m not going to preach at you if you rely on convenience foods, but if you feel like you have no choice but to rely on them then we are here to help.

Marion Nestle from Food Politics recently reported on Brazil’s proposed new dietary guidelines, and we think they are spot on:

  1. Prepare meals from staple and fresh foods.
  2. Use oils, fats, sugar and salt in moderation.
  3. Limit consumption of ready-to-consume food and drink products
  4. Eat regular meals, paying attention, and in appropriate environments.
  5. Eat in company whenever possible.
  6. Buy food at places that offer varieties of fresh foods. Avoid those that mainly sell products ready for consumption.
  7. Develop, practice, share and enjoy your skills in food preparation and cooking.
  8. Plan your time to give meals and eating proper time and space.
  9. When you eat out, choose restaurants that serve freshly made dishes and meals. Avoid fast food chains.
  10. Be critical of the commercial advertisement of food products.

We don’t avoid meat. We don’t avoid carbs. We don’t avoid wheat. We don’t avoid fat. We don’t avoid bread, or bacon, or bananas, or beer, or butter, or beef. So what won’t we eat? Anything that isn’t food. We eat hardly any of what Pollan calls ‘edible food-like substances’, despite their prevalence in the modern diet. And although we really are against those non-foods in principle, that probably isn’t the main reason we consume so little. The truth is that with all that variety of delicious, delicious food in our diet, we just don’t miss them at all.

Malted Chocolate Pecan Pie from Kiwi and PeachWe ate this Malted Chocolate Pecan Pie without a second thought, because we made it from scratch
with the help of the excellent Four & Twenty Blackbirds Pie Book

Happy Pancake Day!

Hello there. It’s been a minute, hasn’t it? First of all, I want to thank you all so much for the sweet comments about my D’daddy’s passing. As a wise friend said, “Grandfathers are simply wonderful things that shouldn’t be allowed to die at all.” I so agree, but unfortunately that isn’t how life works. I am incredibly thankful that I had so much time with him and so many happy memories. Thank you for your patience and for giving us time to reflect on them.

But on to happier topics… It’s Pancake Tuesday! I think we will be trying a variation of our favorite Whole Wheat Pumpkin Spice pancakes, but maybe with sweet potato instead of the pumpkin, and sorghum syrup instead of honey and I’ll replace the pumpkin pie spice with cardamom, ginger, and orange zest, and while we’re at it, top it with pear compote, so really not like our favorite pancakes at all.

What are you whipping up today?

Whole Wheat Pumpkin Spice Pancakes from Kiwi and Peach

Whole Wheat Pumpkin Spice Pancakes

{makes 6 pancakes}

the wet:
1 1/4 cup buttermilk
1 egg
1 Tbsp butter, melted

the dry:
1 1/4 cup whole wheat flour
1 Tbsp sugar
1/2 tsp salt
1/2 tsp baking powder
1/4 tsp baking soda

for the pumpkin mix:
1/2 cup pumpkin puree
1 Tbsp honey
1 tsp fresh diced ginger {or 1/2 tsp of the powdered ginger}
1 tsp cinnamon
1/2 tsp nutmeg
dash of allspice

Start heating up your griddle or, in my case, a pan on medium heat. {I actually use two pans because it makes it go so much quicker!}

In a large bowl, whisk together your wet ingredients. If you don’t have buttermilk on hand you can always mix 1 1/4 cup of milk with 1 tablespoon of lemon juice. It will get the job done.

Put a sieve over the bowl and measure your dry ingredients. Using a fork, mix the dry ingredients in the sieve and then give it a shake until all the dry has fallen through. Gently stir it all together. There might be some lumps but the key here is to not over mix it. The buttermilk and the baking powder are getting to know each other and we want to give that relationship some room to grow if we want perfectly fluffy pancakes.

In a separate bowl mix all of the pumpkin spice ingredients together then add it to the batter. Gently stir it in.

Now lets make some pancakes!

Drop a bit of canola oil in the hot pans, and using a 1/3 cup measuring cup pour in the batter. Let it cook for about 3-4 minutes or until it’s looking pretty solid then flip. I usually only cook it on the other side for 1-2 minutes, then transfer to a plate. For a bit of extra crunch and burst of flavor, sprinkle a bit of whatever homemade granola you have laying around on top of the pancake just after your pour the batter into the pan. It’s delicious!

Repeat until you’ve used up all of your batter.

Sprinkle some spiced pumpkin seeds over the top and serve with warm maple syrup! Enjoy y’all!

This recipe was originally published in a guest post I wrote for Charming Lucy. I’m reposting it here to provide some inspiration for Pancake Day!