
The Kiwi is here today to tell y’all all about the time we decided to build our own king-size bed. In our search for the perfect bed, I fell in love with West Elm’s Boerum Bed Frame. Unfortunately, it was a bit out of our budget. So, being the hero he is, The Kiwi sketched up some plans and a few trips to the hardware store later, I’m writing this on my very own Boerum-style bed for a third of the cost!
When we moved from Germany to the U.S. at the end of last year, we were fortunate that Lauren already owned a car and a houselot of furniture here. That left a bed as our one major essential purchase—I am considerably taller than a double (or, as they’re quaintly called in America, ‘full’) bed is long, and after Germany’s king-size-as-standard that was not going to cut it.
One thing I was already sure about is that I wanted a slat bed. This is what I had back in New Zealand (with an inner-spring mattress), and both of the beds that we had in Germany (with high-density foam mattresses). Slat beds are, as far as I can tell, better in every way than box-spring bases. Unlike box springs, they don’t wear out and are not ugly. They’re also a lot lower-profile, so for the same height of bed you get a lot more space to stock up on toilet paper, whiskey, and other fungible goods to barter with in the event of the collapse of the global monetary system (as one of our friends in Germany does), or just for your crazy dog who likes to lie under things, even if it means occasionally getting stuck and needing rescue at 3am. For instance.
Slat beds are ubiquitous in Europe, and becoming increasingly popular in New Zealand. In America, however, they remains somewhat unusual. As evidence of this, search for them on the Internet and you’re bound to find at least one person recommending that you just slip a sheet of plywood under your mattress and get all the benefits of a slat bed, with a bunch of replies from people saying that worked great for them. Do NOT put plywood under your mattress. Mattresses need to breathe, and if you don’t give them a chance you’ll start growing the sort of mould that at best might start producing neurotoxins that put you afoul of international chemical weapons treaties, and at worst could spontaneously self-organise into some sort of Lovecraftian horror. Just say no, for Cthulhu’s sake.
Naturally our first thought was to simply buy a bed. Research revealed that our options were limited to a nice-ish wooden bed from for around $450, or an Ikea laminate monstrosity for more like $275. After lengthy consideration, we decided to bite the bullet and get the nicer one. Then we discovered that the $50 Internet ‘delivery’ charge applied even if you picked up the bed from the store rather than get it delivered. Once we started going through the checkout process online, it transpired there was another $50 delivery charge to get it delivered to where we actually were, since the store didn’t have any in stock that you could pick up there anyway. We probably should have remembered that it’s perfectly normal here to advertise prices that don’t include the tax you have to pay, but having spent all but one year of my life in countries where it is most definitely illegal, I hadn’t. Neither had Lauren—we can both testify to how easy it is to forget how your own country works in only a couple of years. Now more than 30% over our already-stretched budget, we balked, abandoned the Kafkaesque website checkout and its misleading pricing and headed for the hardware store to size up our options. How hard could it be to build a bed?
The result cost about half as much as the Ikea option in materials (the $150 figure, by the way, includes sales tax), probably still worked out cheaper than the solid wood bed even if you attached a significant cost to our time, and looks better than either if I may say so myself. I’d estimate that we put about three half-days of work into it in the lead-up to Christmas. (Unless your body is used to this particular kind of physical work—in which case you probably don’t need this post—I would not recommend trying to force a shorter schedule.) This blog is mostly about food, but today you get a recipe for a bed that you should be able to repeat yourself, without the hassle of trying to design it yourself or the 3 return trips to the hardware store as it changed over time.

King Size Slat Bed
Timber:
| Lengthwise | Crosswise | Vertical | |
| 4″ × 4″ Cedar | 6 × 8″ | ||
| 8″ × 0.75″ Cedar | 2 × 80″ | 2 × 78½” | |
| 3″ × 1″ | 15 × 75″ | ||
| 2″ × 2″ | 2 × 77″ | ||
| 4″ × 2″ | 1 × 80″ | ||
| 2″ × 1″ | 28 × 3″ |
Note that the dimensions given for wood are always the rough-sawn sizes. You want to buy dressed timber, so while these are the sizes you’ll see labeled, if you measure them you’ll find they’re considerably smaller. Use only untreated timber, and make sure you select pieces without any noticeable kinks or twists, which can make your life a living hell. The hardware store will likely be able to cut everything to length for you for free, but they’ll mostly likely not be able to rip anything down to a smaller size, so make sure you find material with the dimensions you want. Hang on to the offcuts, there will be uses for those too.
Fasteners:
- 8 Corner brackets
- 60 ⅝” wood screws
- 50 2″ #8 wood screws
- 12 3″ #10 wood screws
- Wood glue (e.g. Liquid Nails)
Tools:
- handsaw
- electric drill,
- spirit level
- square
- caulking gun
- sandpaper
- vise (optional but very handy for the sanding and sawing)
Your first, and perhaps most arduous, task is to sand down all of the external parts of the bed. This is essential for a smooth finish, as even dressed boards will have tool marks, rough patches and grain in relief (and the grain will be brought out even more when you stain it). My obsession with sanding has earned me a reputation that will take years to live down, but it’s worth it. Sand thoroughly first with a medium-coarse ~120 grit paper, then remove the artifacts left by that using a fine 220 grit paper.
In our case, the cedar planks were dressed only on one side, and that was fine—we just used that side as the outside. Don’t bother giving the inside anything more than a quick once-over, except for a couple of inches at either end of the head and foot boards, which will overlap the side boards and be visible. The legs were not dressed at all, and thus required the most work (the vise was handy at this point—use a couple of the offcuts from the slats to avoid damaging the timber in the jaws). Don’t forget about the ends—sand some 45° chamfers first to avoid splits, since it’s practically impossible to work with the grain on the end grain. Round off all the edges and corners as you go, because they’ll be the things attacking your shins and toes in the dead of night for the rest of your life.
You could stain the wood at this point, but there’s a risk of damage as you continue to build the bed. In most cases you’ll be building the bed in a different room to the one where you want it, so you’ll have to disassemble it at some point anyway and that is the best time to stain. In our case those rooms were about 250 miles apart, but even if they’re as close as your bedroom and your garage, that won’t help you get a King-size bed through the door.
The two 2″ × 2″ rails are going to sit on the legs and bear the main weight of the bed. Begin by screwing them (with the 2″ screws) to the insides of the two side (i.e. lengthwise) planks, flush with the bottom edge and equidistant from each end. About 5 screws in each should be plenty to hold them. (Edit: It turns out that there is considerable force transfer from the rails to the sides, Cedar is a pretty soft wood, and the sides don’t offer a lot of depth for the screws to bite. To avoid developing future squeaks, more screws are better and glue is recommended too.) Put at least 20 or so screws in each side. If you favour the belt-and-braces approach you can glue them first as well. We didn’t because we were making it up as we went along and not sure that we would get it 100% right first time. Cut the offcuts into four ~4″ sections and fix them to the head and foot planks around 3″ from the ends. These allow you to stand those boards upright while you work, and give you something to screw to the legs later.
The corners use an overlapping joint design, because that is the easiest thing to get looking good with minimal carpentry skill. The nicest-looking joints are of course the dovetail or mortice and tenon, but those require enormous amounts of skill (and equipment) to get right. A simple butt joint has to line up exactly to avoid looking badly made, whereas an obviously-intentional overlap hides a multitude of sins.

Assemble the four cedar planks into a bed shape, with the head and foot boards protruding beyond the sides. The interior width of the bed should be 76″. Using the square and level, square up the corners and screw two angle brackets into each one. This is, of course, much harder than it sounds. It pays not to completely tighten the screws until you have worked your way around all four corners. Place the center rail down the centre and attach it to the head and foot boards with an angle bracket at each end too.
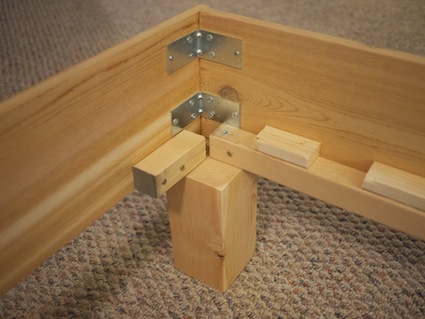

Now lift the whole thing up and place a leg under each corner (invite your friends!), and the remaining two legs under the centre rail, about a third of the way in or wherever you like. Make sure everything is level again, then screw the two side rails and the centre rail into the legs using the long screws. These ones will need to be pre-drilled. Don’t screw the short sections of rail on the head and foot boards into the legs yet, since you’re just about to have to take it all apart anyway. Use two screws for each of the legs on the centre rail. It pays to do all of this on a flat surface, but once of the great things about wood as a material is that if you get it close enough, it will adjust to the correct shape under its own weight. Don’t work on a hard surface like concrete, though, because you’re likely to damage the finish. Some old carpet without underlay is ideal.
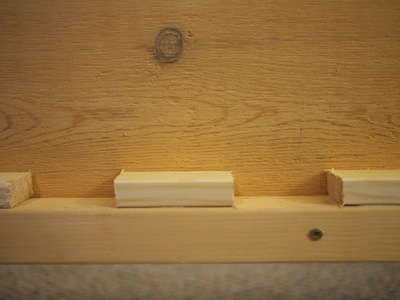
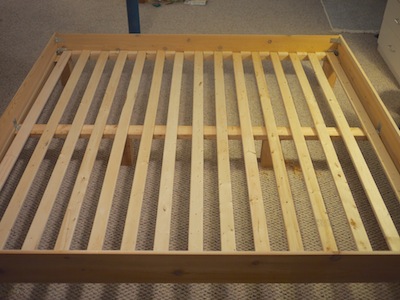
Arrange your slats across the bed. It looks like a bed! Take your 3″ sections of 2″×1″ and place them along the rails between the slats to space them, then carefully remove the slats and mark the positions of the spacers with a pencil. I just cut these with a handsaw, because it seemed cruel to ask the hardware store guy to do so many. If I hadn’t been feeling lazy at the time, I would have cleaned up the edges with some coarse sandpaper. Glue the spacers to the rails. We used Liquid Nails. Before the glue dries, put the slats back and make sure they all still fit. Adjust as necessary. Then remove them again so you don’t accidentally glue them down.
It’s time to stain the bed. The exact colour was a cause of heated debate between us. Lauren want it really dark so as to hide the beautiful grain and colour of the wood and make it look like the fake-mahogany-but-actually-obviously-MDF furniture you see in every American furniture store. Whereas I wanted to use a light touch, more like the light pine furniture and floors and ceilings and walls that we were so thoroughly sick of in Germany. We both reluctantly compromised on Varathane’s ‘Provincial’ (beware: these names are in no way, shape or form standardised across stain producers), but as soon as we saw it we both agreed that the colour was completely perfect after one coat. Ideally you’d want to get to perfect after two coats, but we weren’t going to risk it.
Disassemble the bed by removing the two ends. Leave the legs attached to the sides. Then apply the stain to all of the cedar parts. Don’t bother about the inside other than the top couple of inches, because the unfinished surface will really drink up the stain (which can possibly lead to warping). You’ll probably want to let it dry for a day or so between coats, and for a couple of days after the second coat before using it. We used those disposable foam brushes and they were great, despite the tendency of the handles to come apart.

You’re basically done. Reassemble the bed in the room you actually want it in. If you’re transporting it first, be sure to wrap everything in blankets to avoid damaging the finish. With all the screw-holes already made, it should be a quick matter to reattach all the brackets. Real beds use a two-part bracket arrangement to make this step a little easier, where each part screws in to one side and then the two bolt together. I don’t know where to find those here though, so the angle brackets did the trick. Pre-drill and then screw in the short rail offcuts on the ends to the legs.

You’ll probably want to either varnish the surface with polyurethane or wax it to seal it at some point (give the stain a good few days to dry first though). We haven’t done ours yet, but will at some point in the next month or so when our bookcase arrives.
Replace the slats. Just to add a little stiffness, screw down the first, last and centre slats to the rails on each side. Since this will necessarily be very close to the ends, pre-drill the holes to avoid splitting the slats.
That’s it! You have a bed! Just drop in a mattress and you are good to go. Be aware when you’re shopping that a mattress sitting on a slat bed will be somewhat firmer than when it is on a box spring, so take that into account. We got a lot better deal—read, half the price—from a local country furniture store than at any of the five franchises of a single national chain that are inexplicably clustered on a half-mile stretch of the same road here.
The end result is beautiful, functional, and can offer the satisfaction of going to sleep every night knowing that you built it yourself. Enjoy!

A few notes:
The bed that really stretches the limits of material strength is not the king, but the queen. A king-size bed is so wide that you have no choice but to include a centre rail with its own legs, reducing it to the equivalent of two king singles in terms of weight distribution. So if you try to scale this bed down you can remove the centre rail, but not without increasing the strength of the slats. (I would use 4″×2″/100×50mm slats for a queen size bed.)
We have vague plans to build our own headboard some day that will attach inside the bed. If you want to do the same, add a couple of inches to the lengths of all the lengthwise members.
Just a few more weeks to sign up for our meal planning service, The Seasonal Supper! Our first collections roll out on June 1st, and I know you don’t want to miss out on a single day of fresh, seasonal recipes and loads of meal planning tools. At just $19.99 a season for four weeks of recipes, meal line-ups, grocery lists, calendars as well as blank tools that you can tweak to make work for you and your life, it’s a steal!


This is awesome! Well done, Kiwi!
Thanks MC!
Top work. Enough to make me not want to liberate my awesome old rimu bed from our bach. I still will, because it is awesome and rimu. But I’ll be faintly regretful all the same.
I am saving this post! I live in the U.S.: northwest Montana to be exact. I have a motorhome which has a platform bed and I wanted to duplicate that for my house. Thankfully, I bought a slat bed. I didn’t know about the mold issue with a solid platform – thank you! I bought a Pottery Barn queen size and it does have leg support on a middle rail. I paid $624.00 delivered and set up but it is painted white and not painted well…not a big problem as I have king size comforters that drape, but still.
At any rate, I love the look of your bed and will in the future make a new frame using my existing slats.
Beautiful and thank you for taking the time to show all of the details and instruction!
So glad you found it helpful! The Kiwi was meticulous. Let us know if you give it a go! I’d love to see your version!
I just found this wonderful tutorial when searching for being a platform bed for our new apartment…and then surprised to find you’re also in Asheville! Welcome to town! 🙂
So glad you found us! I think that bed would be a beautiful addition to y’alls cute bungalow—love your house tour.
And thanks! We’re loving it so far!
I am so in love!! My husband and I bought a metal frame a few months ago to avoid the costs of the nicer ones, and we couldn’t imagine that the cost to build a king-sized frame would be any cheaper. The thing is so squeaky! But I’m going to print this out and get started. Thank you so much for the detailed instructions and photos! 🙂
No problem! We were surprised at how inexpensive the project turned out to be too. We’d love to see photos of your finished bed if y’all make it.
Love this post and hope to attempt this one day! I do find the timber materials list a little confusing though. Is each dimension 1 piece is wood?
The dimensions are on the left, with the quantities and the lengths to cut them to in the lengthwise/crosswise/vertical columns. So (looking at the first line) the legs, for example, are of made of 4″×4″ Cedar cut into 8-inch lengths and there are six of them.
-Z
Beautiful stain! And I love the bedspread! Where did you get it?
Thanks! I scored the quilt from Anthropologie on sale ages ago and have remarkably never gotten tired of it!
Pingback: DIY Bedside Table from an old TV tray stand | Kiwi + Peach
We’re making this bed frame for our frugal and awesome Tuft and Needle mattress!
If you’re in the market for a new mattress and want $50 off and free shipping, use this link:
https://www.tuftandneedle.com/r/1aUNltnU
We’re making some adjustments – a higher frame, reinforced legs and a shallower frame. (Our mattress has a 5″ depth.) I’ll try to post a photo in some manner after we’re done!
Cheryl, I’m curious how your adjustments worked out, especially your reinforced legs. I’m also considering a Tuft & Needle mattress.
This is gorgeous and exactly what I envision, yet can’t find to buy anywhere. Maybe I missed it, but what material did you use for the slats?
We just used pine since it wouldn’t be visible. Just be sure to select pieces that aren’t curved or warped. Ours has held up great!
Love the plans but I still have a few questions. Which fasteners go to which brackets? And I’m assuming the 60 5/8″ wood screws, 5/8″ are the length? Still new to this carpentry thing.
Yep, that’s correct 🙂
-Z
My wife and I just made this bed using your plans, and we absolutely love it! We just moved to a new house and needed a bed for our king size mattress; we got tired of sleeping on the floor, but balked at buying one made out of compressed bran flakes or whatever that stuff is, since our old Ikea bed in the guest room is falling apart after just 5 years.
I have no previous woodworking experience, but I wanted something simple, that was real wood, but would be sturdy and not look too bad. Your plans were absolutely perfect! We managed to finish it this weekend, though it still needs the stain, but it is functional and looks great. I bought a refurbished Ryobi power sander for $30, which helped immensely. Thanks so much for sharing your plans, It was just what we needed. Next we plan to build a nice cushy headboard, and maybe a cedar chest/bench with fabric to match…
Wow! That’s awesome, go you! Thanks so much for sharing. We’d love to see pictures when y’all are done 🙂
– Z
Just wondering which screws should be used to get the 2″x2″ rails onto the lengthwise boards. The math adds up to 2.75″, so the 2″ screw would be too short, and the 3″ screws would be too long, right?
Great question – it’s a trick! Timber dimensions are always quoted at the undressed (rough-sawn) size, before it gets planed smooth. So when you measure your nominally 2″ square rails you’ll find that they’re closer to 1.5″, and the 2″ screws will be just the right length. -Z
Thanks so much for the speedy reply! While purchasing wood I figured this out. The man helpin suggested I go with 1 3/4″ screws and to intentionally countersink a little. We decided this would be good just in case I accidentally countersink the 2″ screw and penetrated the outer surface of the sideboards. I hope he’s right!
Whenever I’m buying screws I always try to get one out of the packet and hold it against the edge of the two surfaces I am planning to fasten so I can be sure in advance of exactly where the point will end up. If in doubt, measure! And if not in doubt, be very afraid and then measure twice 😉
Do you happen to know what all the measurements would be for a queen size? Thanks for this post! Love it!!!
A queen size mattress is 16 inches narrower than a King (but the same length), so just reduce all of the dimensions in the “crosswise” column by 16 inches and you will be set. That makes it 62½” for the head- and footboards, and 59″ for the slats.
Here is a list of a standard mattress sizes: http://en.wikipedia.org/wiki/Bed_size
– Z
I just found your blog and would love to make this frame! However, could you help me figure out the correct inches to convert this frame for a full size bed? I’m not confident I figured it out correctly. Thanks!
I guess by “full size” you’re referring to the US version of what we Kiwis would call a Double bed, which is 54″ × 75″ 🙂
For a double you’ll want to reduce all of the crosswise dimensions by 22″ (76 – 54) each and all of the lengthwise dimensions by 5″ (80 – 75) each.
Note that ‘standard’ mattress sizes vary widely between; https://en.wikipedia.org/wiki/Bed_size is a good reference to check that you’re building for the right size.
– Z
Hey guys, just wanted to say thank you for the inspiration to make our own bed. We too fell in love with West Elm’s Boerum Bed Frame and were bitterly disappointed to find out it’s not available to Australian customers. So I googled “Boerum-style bed” in the hope to find something similar, and here I am at your blog! Ours will be a slightly modified version of yours as it will be Queen size, and using American Oak instead of Cedar. We just bought the wood today and can’t wait to get started. My dad’s pretty excited about it too as he’s always made his own furniture and has been assigned as “head foreman” for this project. Will let you know how we go. Thanks a million!
Having read this, my wife and I are really excited about building our own slat bed. We’re in New Zealand though where Cedar isn’t so easy to come by — could you recommend a different wood that will give similar results, something that might be more readily available here?
To be honest, you could probably use just about anything. Cedar is not a particularly hard wood, so even something like (dressed, furniture-grade) pine should perform in much the same way. We chose cedar because we liked the reddish colour, and because it was available and we didn’t want to splash out for oak. You can alter the colour up to a point when you choose the stain though.
Be aware that mattresses are different sizes in New Zealand, so check http://en.wikipedia.org/wiki/Bed_size and make sure you adjust the dimensions from the US sizes given here. Good luck!
– Z
I recently converted my old bed-frame into a slat bed using old, slightly rough timber. To protect the mattress I fastened an old blanket over the slats. After reading your Lovecraftian warnings, I wonder if the blanket will impede the airflow to the underside of the mattress? The blanket is pure wool, so ought to breathe well, and the spaces between the slats are 11.5cms. Also, I sleep with a lot of covers on top of the bed. Would it be a good idea to turn the mattress regularly?
I should prefix this by saying that I am by no means a mattress expert and you probably shouldn’t be listening to me for advice.
That said, my best guess would be that (a) it is probably OK, and (b) it’s probably unnecessary as long as you have a friend to help you drop the mattress straight down on the slats (rather than lower it at an angle, which could be problematic with rough-sawn wood). Once the mattress is on the bed the slats just don’t tend to move around, so they’re unlikely to damage the mattress.
– Z
Love your slat bed. I do have a few questions. You said to square it up so interior measurement is 76″ but the slats are cut to 75″. Is that correct? Since the mattress is 76″wide, isn’t it hard to tuck in a blanket and quilt on the sides? I plan on building a bed like yours but I’m thinking about making the legs about 14″ high so it will look right with my bookshelf headboard. And maybe a couple inches wider to make it easier tucking in blankets. What do you think? Thanks for such detailed plans. Awesome job.
Yes, the slats are slightly shorter than the interior width. You want them to be not so long that they get stuck when you’re trying to drop them in place, yet not so short that they can fall off one of the rails.
I’ll let you in on a little secret – I thought exactly the same thing about leaving space for your hand when tucking in sheets (despite what you see in the picture, we don’t tend to tuck in the quilt or duvet, so you may want to keep that in mind as you read on). But I can confirm from that experience that you don’t need to make the internal dimensions any bigger for that. It turns out that the size of a real mattress is actually slightly smaller than the nominal dimensions. If you have the mattress already, you can set your mind at ease by measuring it. If (like us) you don’t and are still nervous, you can allow an extra inch or so; you’ll most likely find later that you didn’t need it, but it won’t be a disaster.
(I left this detail out of the post because I didn’t want to confuse people. To be clear, the dimensions given in the post are the ones I recommend.)
I wouldn’t foresee any mechanical issue with having taller legs. The bottom of the mattress will be the height of the legs plus about 2 inches (for the depth of the rails plus the slats) off the ground, so add that to the depth of your mattress to determine where the top will be. We’d love to see pictures with your bookshelf headboard when you’re done!
– Z
I made my bed while waiting for the delivery of my new Leesa king mattress. I did increase the length of my boards. I made the interior width 78 inches and the length 81.5 inches. With this style frame I do like the quilt tucked in. I couldn’t find any untreated 4X4 so i screwed two 2×4 together to make the legs and glued some carpet to the bottom (to make it easy to push across the floor). I painted my dark headboard and frame with a creamy white chalk paint and then poly. I love how it turned out. I did add a 1×4 towards the bottom since I made the legs 14 inches. I am so proud of my new bed as I am a 61 year old woman and I built it myself without help from anyone. Would love to send you pictures but I don’t see a way to apply attachments here.
Do you have measurements for a queen sized bed or how do I figure that out?
Yes! Check this comment above for details.
Hi. Love the bed. Thanks for posting this! I’m halfway done building it. There’s one thing in the instructions I’m a little unclear on. How exactly do you attach the 4×4 legs to the frame? In the pictures provided I don’t see any screws going through the 2×2 rails into the legs, but the long screws are mentioned. Do you just attach them with the 3″ screws drilled through the 2×2 rails and 2×4 center support? How many do you recommend?
Thanks!
Yes, you’re correct. Long screws through the rails into the legs. I used 2 in each leg.
-Z
Do you have the overall finished height from floor to top of mattress? I’m in the middle of building this, and I don’t want it to be too short! The 8″ seems a little low and I’m thinking of raising the support rails for the slats to the middle of the cedar frame, instead of the bottom. Thanks!
We build a bed close to this — that is, we used this as a guide, and tweaked it to meet our preferences. We paired it with a Tuft & Needle mattress, which is 10 inches thick, but as a foam mattress, it can squish a bit at the edges when you sit on it. We built it to have 4 inches of the mattress within the frame, and 6 inches protruding. The bed rails are 10 inches off the ground, putting the top of the mattress about 25 inches from the floor. We are very happy with how this all worked out.
Did you ever end up making a headboard?